C Projects
Bad Code
 |
 |
 |
|---|
Description
This application was made for a professor in IT development. This one was tired of correcting badly written code so he decided to impose sanctions on those not respecting good programming practices.
This application is therefore used to manage several classes with different types of sanctions in order to manage all of this.
Features
Navigation
| Feature | Detail |
|---|---|
| Navigation between the six headings | Navigation bar: Displays the default view of each section. |
1. Classes management
| Feature | Detail |
|---|---|
| Displaying the list of classes | Default view, table of 6 columns: • Name • Year • Apprenticeship or not • Specialization • User • Sanction affiliated to the class |
| Displaying the creation view | Switch between classes list view and class creation. |
| Creation | Form with 6 fields : • Name: text field • Year: text field (4 digit) • Rhythm: check box if apprentice class • Specialization: text field • Sanction: drop-down list • User: drop-down list |
| Back to the list from creation | Two way to go back: • Submit: add to the database • Return: cancel the current process |
| Displaying the edit view | Switch between classes list view and class edition. |
| Edition | Pre-filled form with 6 fields: • Name: text field • Year: text field (4 digit) • Rhythm: check box if apprentice class • Specialization: text field • Sanction: drop-down list • User: drop-down list |
| Back to the list from the edition | Two way to go back: • Submit: update in the database • Return: cancel the current process |
| Deletion | Remove a class from database. |
| Refreshing the list | Refresh classes list. |
2. Students management
| Feature | Detail |
|---|---|
| Displaying the list of students | Default view, table of 6 columns: • First name • Last name • Total of "bad code" • Total of champagne bottles :champagne: • Class |
| Search bar | Search on the first name in the list, select the first result corresponding to the search. |
| Add a bottle :champagne: in total | Add one bottle :champagne: to one student. |
| Remove a bottle :champagne: in total | Remove one bottle :champagne: to one student. |
| Displaying the creation view | Switch between students list view and student creation. |
| Creation | Form with 5 fields: • First name: text field • Last name: text field • E-mail: text field • Class: drop-down list • Profile photo: file browser |
| Back to the list from creation | Two way to go back: • Submit: add to the database • Return: cancel the current process |
| Displaying the edit view | Switch between students list view and student edition. |
| Edition | Pre-filled form with 6 fields: • First name: text field • Last name: text field • E-mail: test field • Total bottles: text field • Class: drop-down list • Photo: image display + file browser |
| Back to the list from the edition | Two way to go back: • Submit: update in the database • Return: cancel the current process |
| Deletion | Remove a student from database. |
| Add one deliverable | Add new deliverable to a student. |
| Refreshing the list | Refresh students list. |
3. Sanctions management
| Feature | Detail |
|---|---|
| Displaying the list of sanctions | Default view, table of 3 columns: • Name • Description • User |
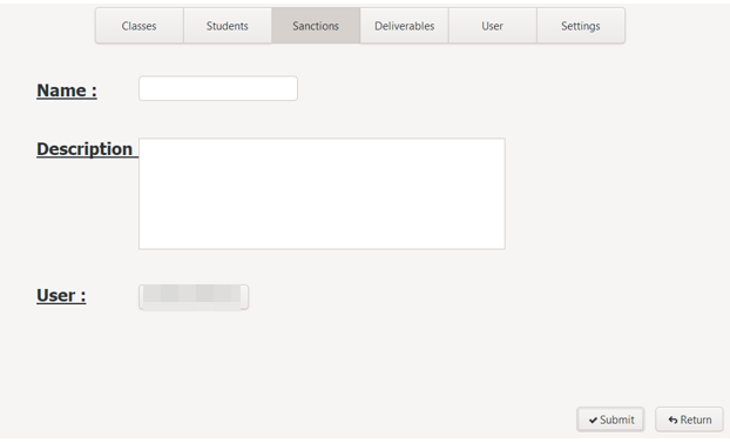
| Displaying the creation view | Switch between sanctions list view and sanction creation. |
| Creation | Form with 3 fields: • Name: text field • Description: text field • User: drop-down list |
| Back to the list from creation | Two way to go back: • Submit: add to the database • Return: cancel the current process |
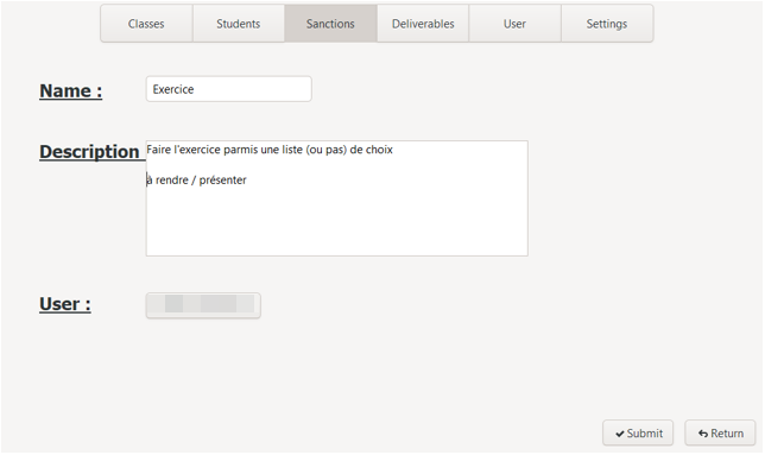
| Displaying the edit view | Switch between sanctions list view and sanction edition. |
| Edition | Pre-filled form with 3 fields: • Name: text field • Description: text field • User: drop-down list |
| Back to the list from the edition | Two way to go back: • Submit: update in the database • Return: cancel the current process |
| Deletion | Remove a sanction from database. |
| Refreshing the list | Refresh sanctions list. |
4. Deliverables management
| Feature | Detail |
|---|---|
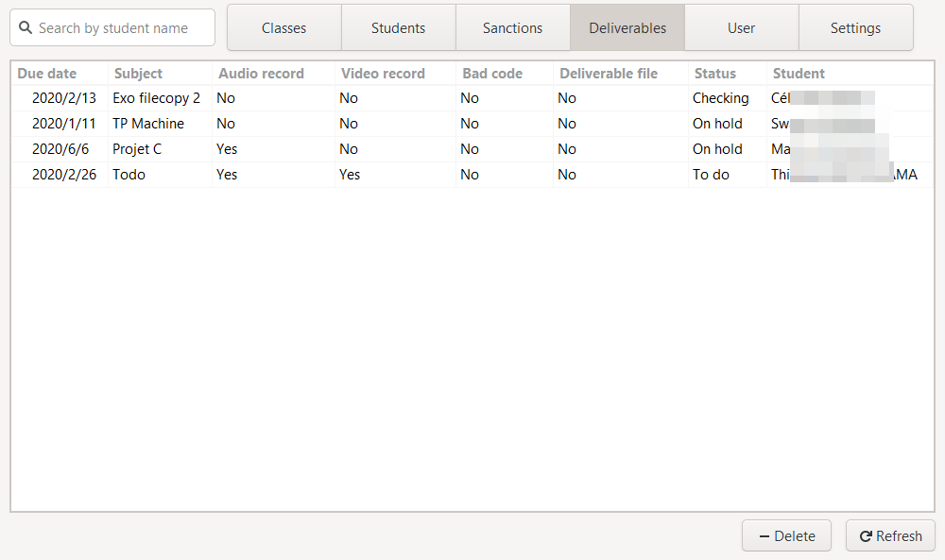
| Displaying the list of deliverables | Default view, table of 8 columns: • Due date • Subject • Audio recording (yes / no) • Video recording (yes / no) • Code file (yes / no) • Other deliverable file (yes / no) • Status • Student |
| Search bar | Search on the name in the list, select the first result corresponding to the search. |
| Displaying the creation view | Switch between deliverables list view and deliverables creation. |
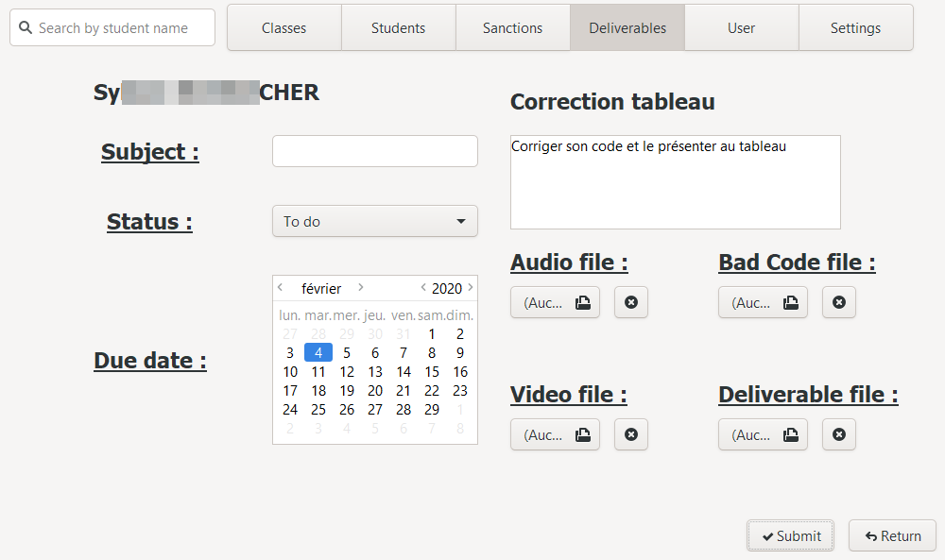
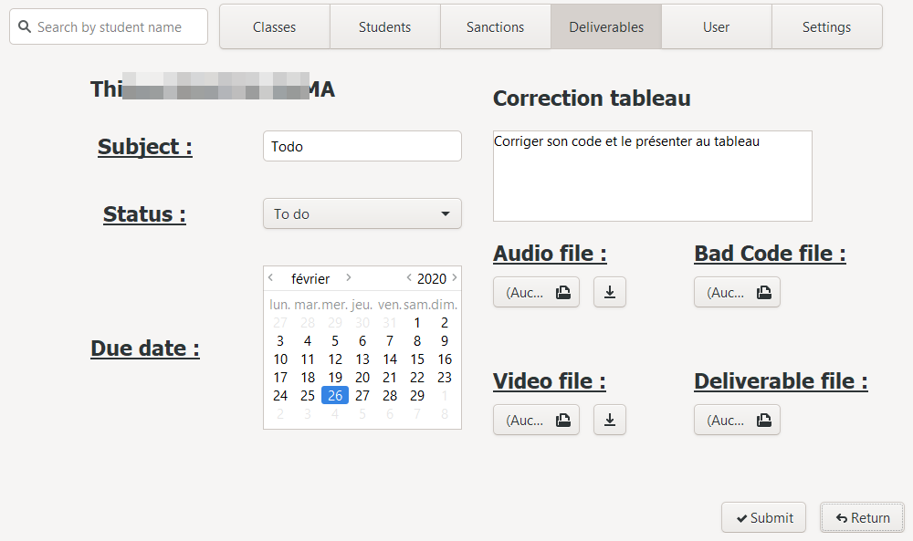
| Creation | Display of the student's name, the name of the sanction affiliated to his class and his description. Form with 7 fields: • Subject: text field • Status: drop-down list • Due date: calendar • Audio recording: file browser • Video recording: file browser • Code file: file browser • Other deliverable file: file browser |
| Back to the list from creation | Two way to go back: • Submit: add to the database • Return: cancel the current process |
| Displaying the edit view | Switch between sanctions list view and sanction edition. |
| Edition | Display of the student's name, the name of the sanction affiliated to his class and his description. Pre-filled form with 7 fields: • Subject: text field • Status: drop-down list • Due date: calendar • Audio recording: file browser • Video recording: file browser • Code file: file browser • Other deliverable file: file browser |
| Back to the list from the edition | Two way to go back: • Submit: update in the database • Return: cancel the current process |
| Deletion | Remove a sanction from database. |
| Refreshing the list | Refresh sanctions list. |
| Download | From edition, for each type of file, if a file is associated with the deliverable, a download button appears. |
5. User interface
| Feature | Detail |
|---|---|
| User information display | Default view, 5 fields: • First name: text field • Last name: text field • E-mail: text field • Date of birth: label cannot be modified • Photo with file browser for instant modification |
| Displaying the edit view | Switch between user view and user edition. |
| Edition | Pre-filled form with 4 fields: • First name: text field • Last name: text field • E-mail: text field • Date of birth: label cannot be changed |
| Back to information from the edition | Two way to go back: • Submit: update in the database • Return: cancel the current process |
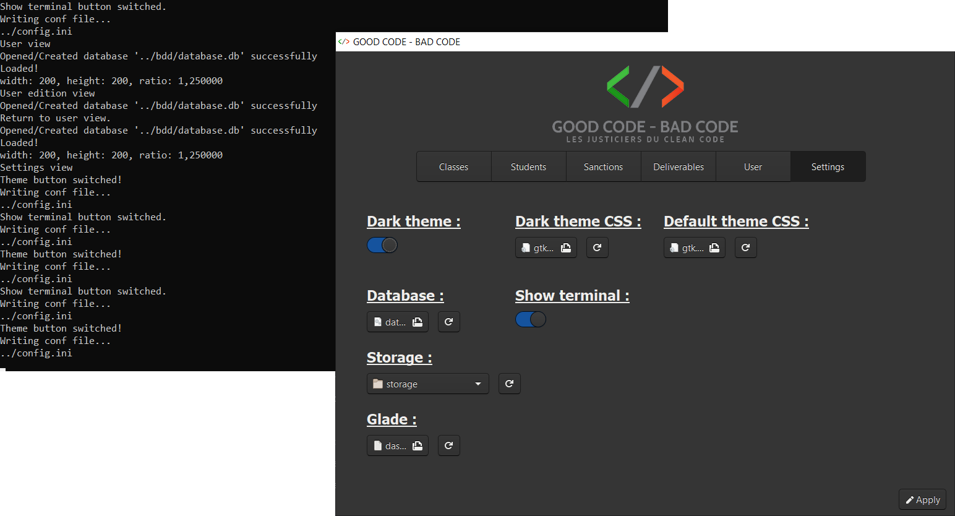
6. Settings
| Feature | Detail |
|---|---|
| Display of current settings | Default view, 7 editable settings: • Dark theme: switch button (instant update) • CSS file of the dark theme: file browser • CSS file of the default theme: file browser • Database file: file browser • Data backup folder: folder browser • Glade file: file browser • Terminal display: switch button (instant update) |
| Update settings | Apply changes in conf file. |
Usage
1. Navigate between the sections
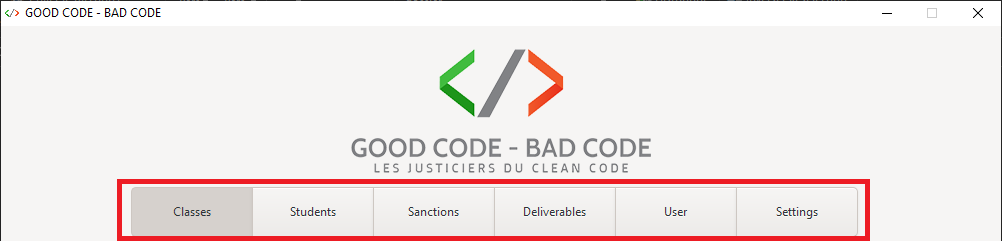
To access a specific section, click on the corresponding button on the menu bar, under the application logo.
2. Classes
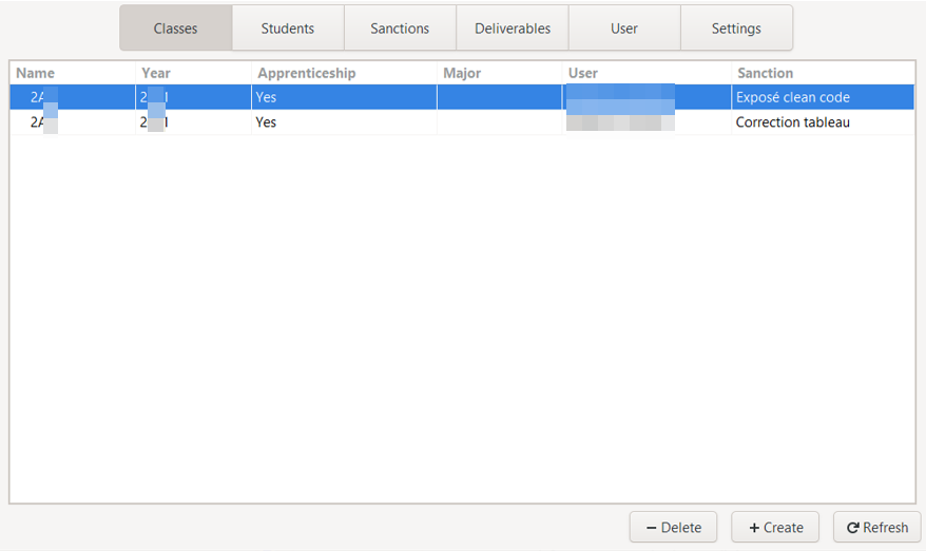
a. Consult the classes list
The list of existing classes is the default view of the section. For each of the classes, we can see in the table:
- Her name
- The year of graduation
- Apprenticeship status
- The specialisation
- The name of the user who created it
- The associated sanction
By clicking on the name of a column, it is then possible to sort this list in alphabetical or reverse alphabetical order.
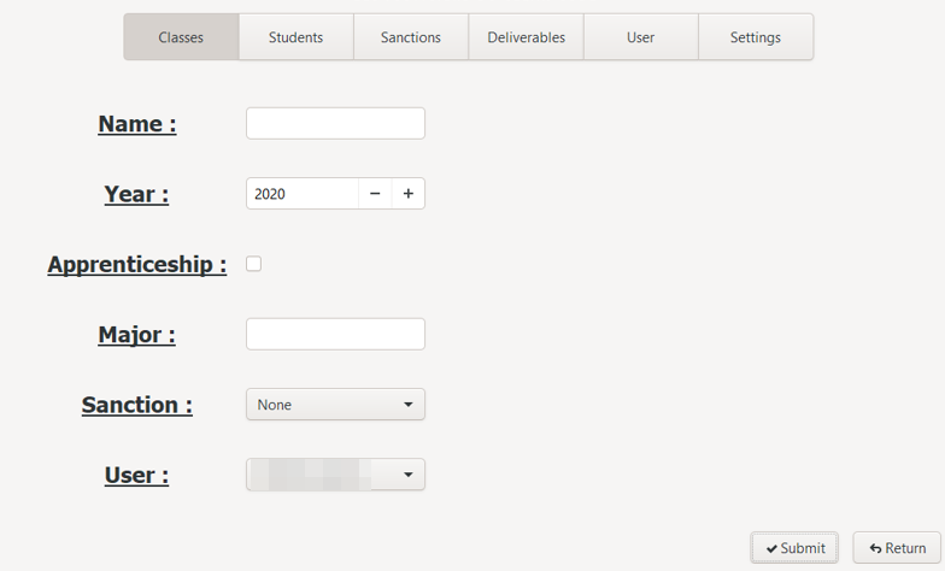
b. Create class
To create a class, click on the "Create" button at the bottom of the window. A form appears, allowing you to add the necessary information:
- His name: required field
- Year of diploma: 4 required digit
- Apprenticeship status
- The specialisation
- The name of the user who created it
- The associated sanction
To submit creation, click on the "Submit" button at the bottom of the page. To cancel, click on the "Return" button. In both cases, the list of classes is then displayed.
In case of validation of the creation, the new class will be present in the list.
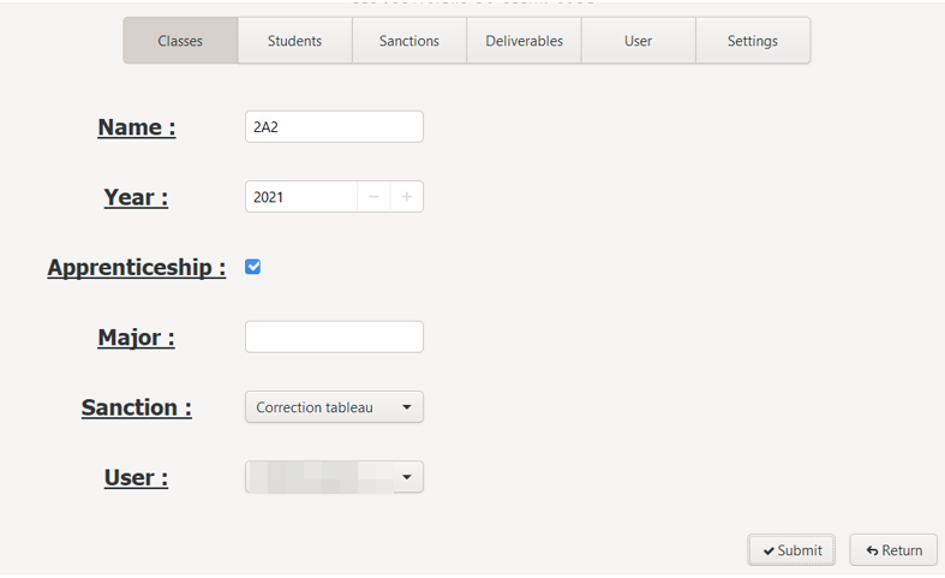
c. Edit class
To update a class and access the edit interface, two solutions are possible: double-click on the desired line, or select it the first time with a single click, then press the Enter key.
The edit interface is displayed: it is very similar to the creation interface, except that the fields are pre-filled with the current information of the selected class.
d. Delete class
To delete a class, you must first select it, then click the "Delete" button at the bottom of the window.
e. Refresh classes list
To refresh the classes list, click on the "Refresh" button at the bottom of the window.
3. Students
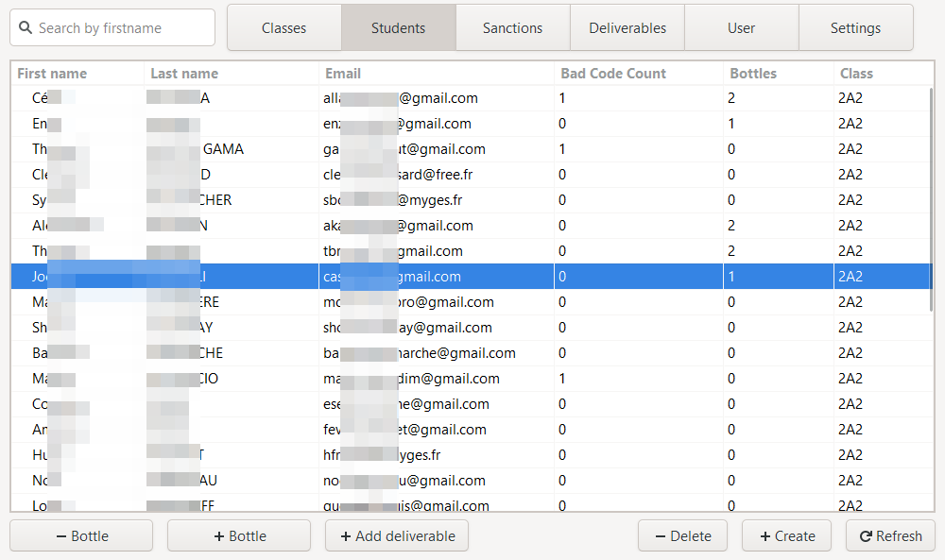
a. Consult the students list
The list of existing students is the default view of the section. For each student, we can see in the table:
- His first name
- Her name
- His e-mail address
- His total bad codes
- The number of bottles of champagne he must give as an offering
- His class
By clicking on the name of a column, it is then possible to sort this list in alphabetical or reverse alphabetical order.
A search bar is also available on the left of the menu, allowing you to perform a search on first names: the first line corresponding to the search is then selected.
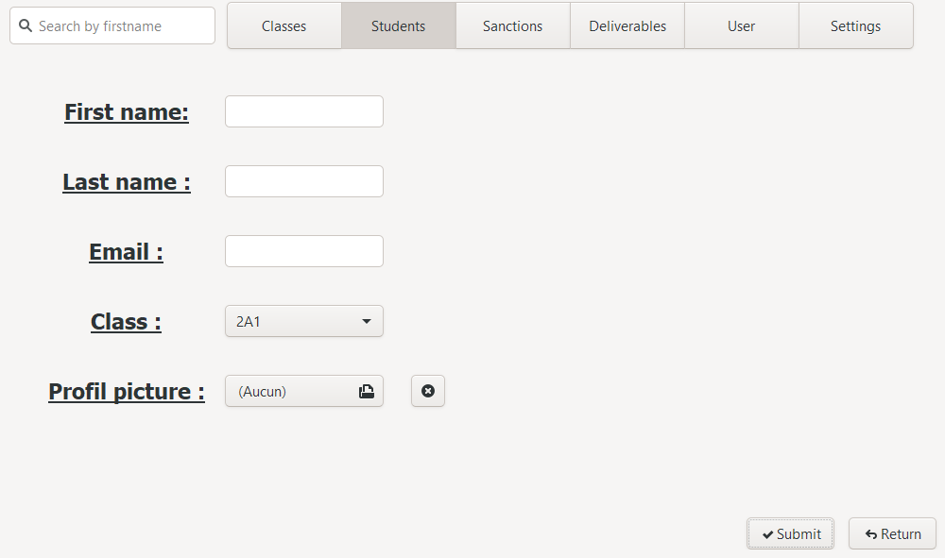
b. Create student
To create a student, click on the "Create" button at the bottom of the window. A form appears, allowing you to add the necessary information:
- His first name: compulsory
- His name: compulsory
- His e-mail address: mandatory
- His class
- His profile photo: only image formats are accepted.
The profile photo can be added from this interface using the file browser: a copy of the original photo will then be saved in a specific folder in the application. Once the file selected, it is then possible to click on the button with a cross allowing to cancel the choice. If no profile photo is selected, a default image will be assigned.
To submit creation, click on the "Submit" button at the bottom of the page. To cancel, click on the "Return" button. In both cases, the list of students is then displayed: in case of submmit of the creation, the new student will be present in the list.
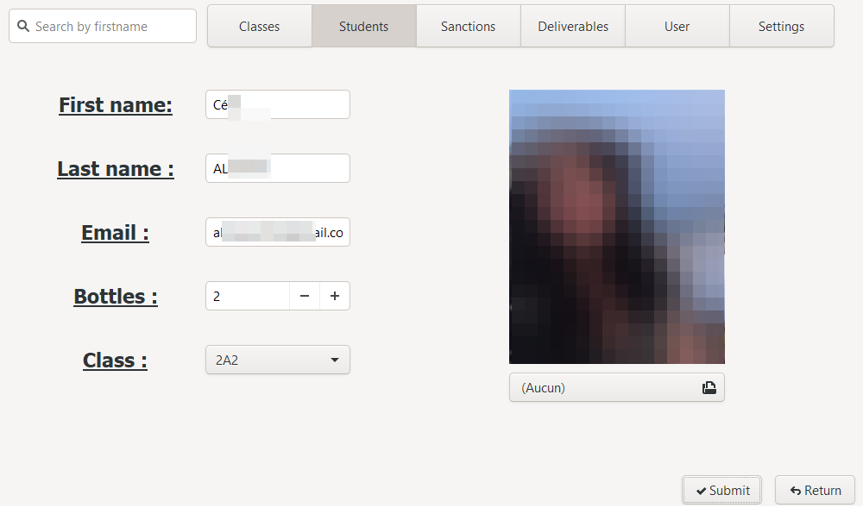
c. Edit student
To update a student and access the edit interface, two solutions are possible: double click on the desired line, or select it the first time with a single click, then press the Enter key.
The edit interface is then displayed: this is similar to the creation interface, with the difference that the fields are pre-filled with the current information of the selected student, the resized photo of the student is displayed.
A text field allows manual modification of the number of champagne bottles :champagne:. It is also possible to change this number directly via the student list: to do this, select the appropriate line then click on the "+ Bottle":champagne: or "- Bottle":champagne: buttons (the number of bottles :champagne: cannot be negative).
d. Delete student
To delete a student, you must first select their line, then click on the "Delete" button at the bottom of the window.
All the files and folders associated with this student (photos, deliverables, etc.) are then deleted.
e. Refresh students list
To refresh the students list , click on the "Refresh" button at the bottom of the window.
4. Sanction
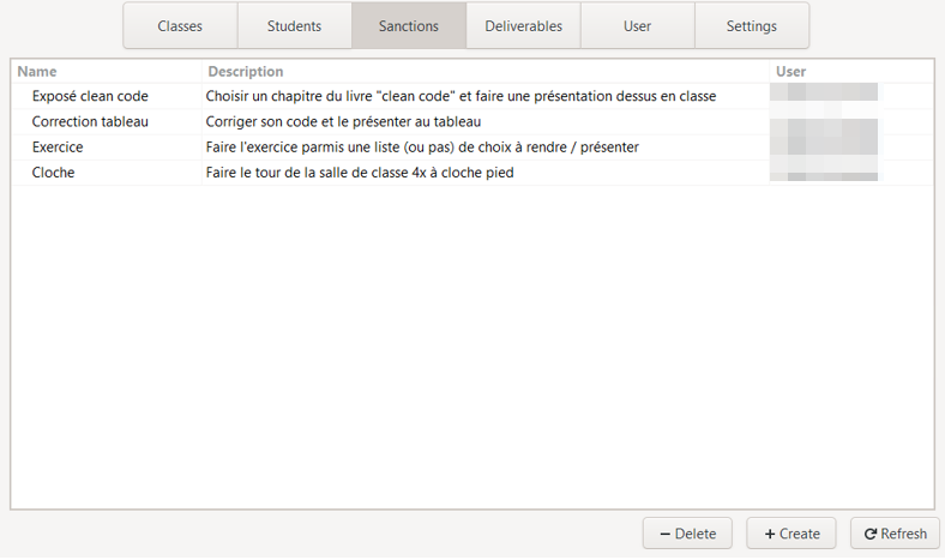
a. Consult the sanctions list
The list of existing sanctions is the default display of the section. For each of the sanctions, we can see in the table:
- Her name
- Its description
- The name of the user who created it
By clicking on the name of a column, it is then possible to sort this list in alphabetical or reverse alphabetical order.
b. Create sanction
To create a sanction, click on the "Create" button at the bottom of the window. A form appears, allowing you to add the necessary information:
- His name (required)
- Its description (required)
- The user who created it
c. Edit sanction
To update a sanction and access the edit interface, two solutions are possible: double-click on the desired line, or select it the first time with a single click, then press the Enter key.
The edit interface is then displayed: it is in all respects similar to the creation interface, with the difference that the fields are pre-filled with the current information for the selected sanction.
d. Delete sanction
To delete a sanction, you must first select its line, then click on the "Delete" button at the bottom of the window.
e. Refresh sanctions list
To refresh the sanctions list , click on the "Refresh" button at the bottom of the window.
5. Deliverables
a. Consult the deliverables list
The list of existing deliverables is the default view of the section. For each of the deliverables, we can see in the table:
- Its scheduled delivery date
- His subject
- If there is, or not an audio recording
- If there is, or not a video recording
- If there is, or not a bad code file
- If there is, or not another type of file (PDF, PowerPoint, Word, Archive…)
- Its status: "pending", "finished", ...
- The concerned student
By clicking on the name of a column, it is then possible to sort this list in alphabetical or reverse alphabetical order.
A search bar is also available on the left of the menu, allowing you to perform a search on the names of the students. The first line corresponding to the search is then selected.
b. Create deliverable
To create a deliverable, you must first be on the list of students, select the line of the student concerned then click on the "Add deliverable" button.
A form appears, it recalls the non-modifiable information (the name of the student, the name of the sanction associated with his class and the description of it) and allows you to add the necessary information:
- Its subject: required
- Its status: "pending", "finished", ...
- Its scheduled delivery date
- An audio file: only audio formats are accepted
- A video file: only video formats are accepted
- A bad code file
- Another type of file
Once a file is selected, it is then possible to click on the button with a cross allowing to cancel the choice. Otherwise, a copy of the original files will then be saved in a folder specific to the application.
To submit creation, click on the "Submit" button at the bottom of the page. To cancel, click on the "Return" button. In both cases, the list of deliverables is then displayed.
In case of validation of the creation, the new deliverable will be present in the list.
c. Edit deliverable
To update a deliverable and access the edit interface, two solutions are possible: double-click on the desired line, or select it the first time with a single click, then press the Enter key. The edit interface is then displayed.
It is in all respects similar to the creation interface, with the difference that the fields are pre-filled with the current information for the selected sanction.
In addition, if a file is already associated with the deliverable, it is then possible to download a copy at the location chosen by the user via the download interface.
d. Delete deliverable
To delete a deliverable, you must first select its line, then click on the "Delete" button at the bottom of the window.
e. Refresh deliverable list
To refresh the deliverables list , click on the "Refresh" button at the bottom of the window.
6. User
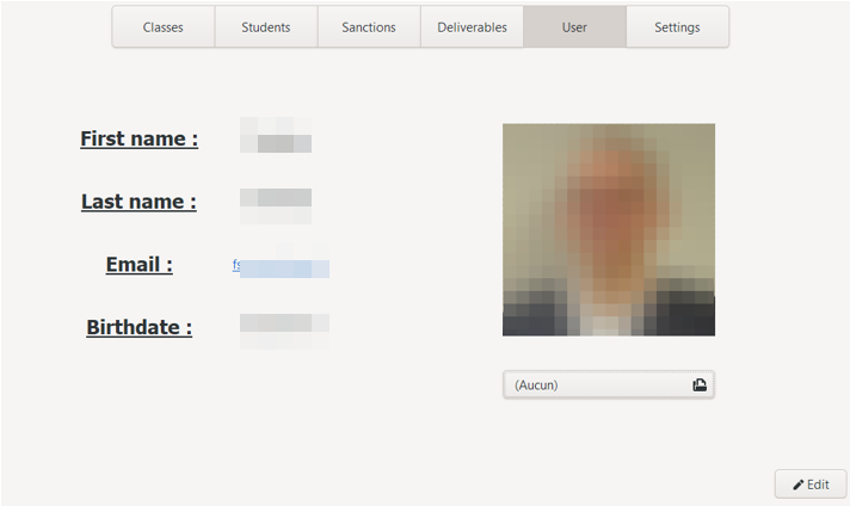
a. View user's information
User's information is the default view of the topic and consists of five fields:
- His first name
- Her name
- His email
- His date of birth
- His profil picture
His profil picture can be modified directly from this interface: only image formats are accepted. If a photo is added, a copy of the original photo will then be saved in a folder specific to the application, and the new image will be directly displayed at the correct size.
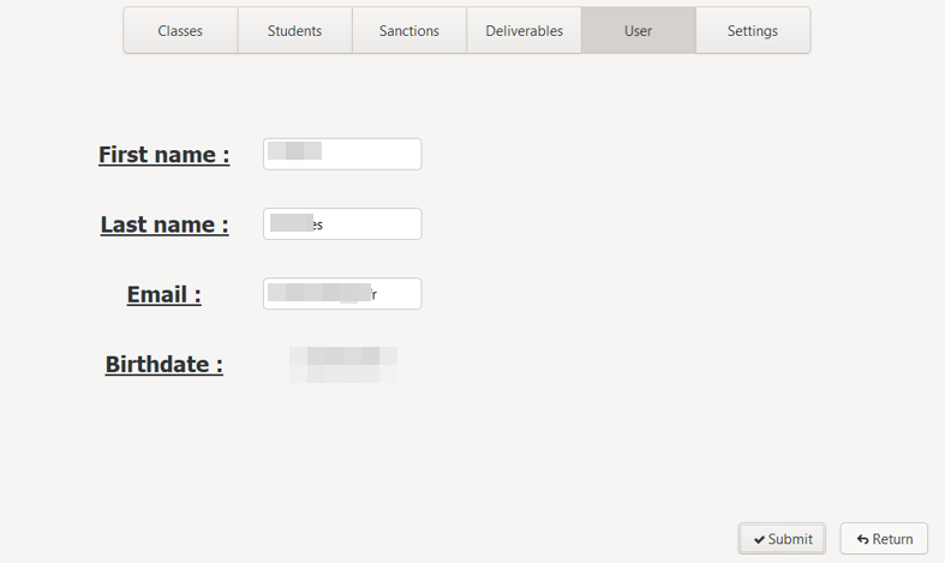
b. Update user
To access the user edit interface, click on the "Edit" button: the edit interface is displayed, allowing you to modify the three required information (first name, last name and e-mail) .
The date of birth is obviously not changeable :nerd_face: :champagne: :100:
7. Settings
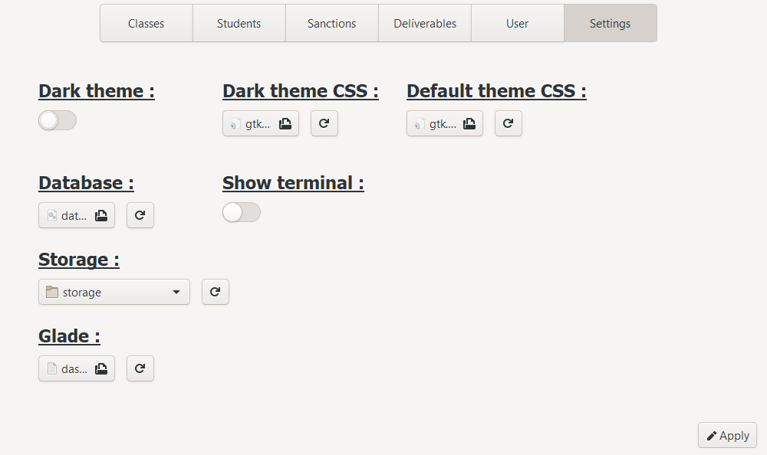
a. Consult current settings
The settings section displays the global variables of the application, located in the configuration file:
- The current theme (dark or classic)
- The CSS file of the dark theme
- The CSS file of the classic theme
- The database file
- The application data backup folder
- The Glade file
- If the console is displayed or not
b. Update settings
The update of the settings values is done directly from the display page with:
When a file or folder is selected, it is possible to cancel this selection and return to the initial value (the one present in the configuration file) using the "Reset" button located next to each file selector. To submit the new values and write them on the configuration file (saving them for the next opening of the application), click on the "Apply" button. In fact, if the switch buttons directly display the result of their value (allowing dynamic juggling between themes), the others will only be saved by clicking on the "Apply" button.
Installation
Using setup file
You can install this application with the setup file located here : installation/bad_code_setup.exe
Cmake compilation
Or compile it with the CMakeLists.txt
Warning ⚠️⚠️⚠️ !!!
In both case, you will need to have mingw installed with gtk+3.20 at least.
I didn't figured out yet how to compile it in static in all-in-one executable file...
Using msys2 :
Here's the command to execute inside msys2 to be able to compile this project :
pacman -Syu
pacman -S mingw-w64-x86_64-gcc
pacman -S mingw-w64-x86_64-gtk3
Then, you need to link the msys2/mingw64/bin folder to your system environment variable PATH
During the build, if some libraries are not found, go to the folder msys2/mingw64/include and copy them outside of there version folder:
Exemple : copy gtk and gdk folder inside msys2/mingw64/include/gtk-3-0/ directly inside msys2/mingw64/include/
Contributing
If someone has the idea and know how to compile in static with GTK and stuffs to be dependence free on windows OS, be my guest !
Authors
This project was carried out in a group of two people, myself included.
| Joëlle CASTELLI |  |
| Noé LARRIEU-LACOSTE |  |
More Documentation
Here's some stuff I looked at when I was developing this application :
Header files
https://www.tutorialspoint.com/cprogramming/c_header_files.htm
Guides
https://gerald3d.developpez.com/tutoriels/gtk/glade3/
https://openclassrooms.com/fr/courses/1343806-pygtk/1343942-glade
https://www.guillaumeriviere.name/estia/DRI/tp1.php
ThreeView
https://linuxfr.org/users/trim/journaux/utilisation-de-gtktreemodel-gtktreeview-et-consorts https://gtk.developpez.com/cours/gtk2/?page=page_23
SQLite
http://zetcode.com/db/sqlitec/
Codecc
 |
 |
 |
|---|
It's CODEC, but in C
Description
This application is G4C Matrix encryption program developed in C.
Features
| Feature | Description |
|---|---|
| Encode file | Encode a file with a given G4C Matrix |
| Decode file | Encode a file with a given G4C Matrix |
How it works: the theory
We will use a G4C encoding matrix (matrix of 4 lines, each containing the value of one byte expressed with 8 bits) which we will load from a text file in this format:
G4C=[10001111 11000111 10100100 10010010]
Encoding
We will process the file we want to encode byte per byte by making a matrix product with our encoding matrix:
- Our matrix:
G4C=[10001111 11000111 10100100 10010010] - Our byte:
1010 0101
First, as we have a 4-line encoding matrix, we separate our byte in two 4-bit parts: 1010 and 0101. Then, we make a matrix product: in the program, it is actually a XOR between the byte and the matrix.
| Byte / Matrix | 1000 1111 1100 0111 1010 0100 1001 0010 |
|
|---|---|---|
| 1010 | :arrow_right: | 0010 1011 |
| 0101 | :arrow_right: | 0101 0101 |
Result: 10100101 is coded as 00101011 01010101
As we see, one input byte generates an output of two encoded bytes: this means that our encoded output file will be twice bigger than the input source file.
Decoding
Since coding a byte leads to getting two encoded byte, the consequence is that we will need to process the file we want to decode 2 byte per 2 byte in order to get one decoded byte.
The first step is to find the identity matrix in our G4C matrix columns:
| 1234 5678 | :arrow_right: | 5234 |
|---|---|---|
| 1000 1111 1100 0111 1010 0100 1001 0010 |
:arrow_right: | 1000 0100 0010 0001 |
Once we've identified the identity columns, we save their positions: here, it's (5-2-3-4).
Back to our previously encoded byte that generated these two bytes: 00101011 01010101. For each of these two encoded bytes, we will select the bits located at the 5th, 2nd, 3rd and 4th position, and then concatenate them to get back to a 8-bits decoded byte.
| 1234 5678 | :arrow_right: | 5234 |
|---|---|---|
| 0010 1011 | :arrow_right: | 1010 |
| 0101 0101 | :arrow_right: | 0101 |
And voilà!
We've just decoded these two bytes and recovered our original one: 1010 0101
Usage
The program GUI is pretty simple to understand:
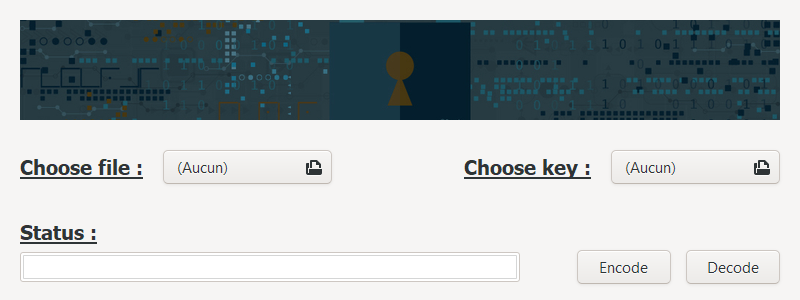
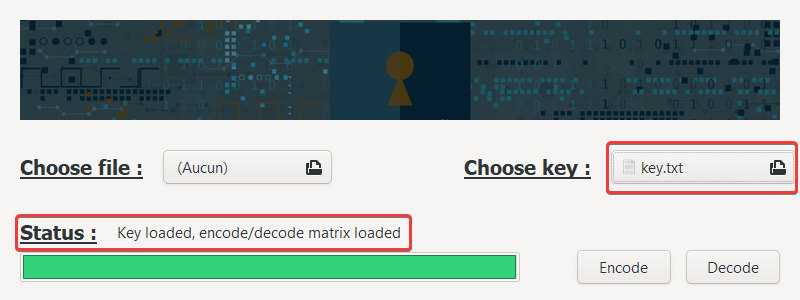
Load the G4C Matrix
First of all, you need to load your G4C matrix text file.
:warning: Your key must be in this format: G4C=[10001111 11000111 10100100 10010010], otherwise it won't work.
Load the file
Then, choose the file you want to encode or decode:
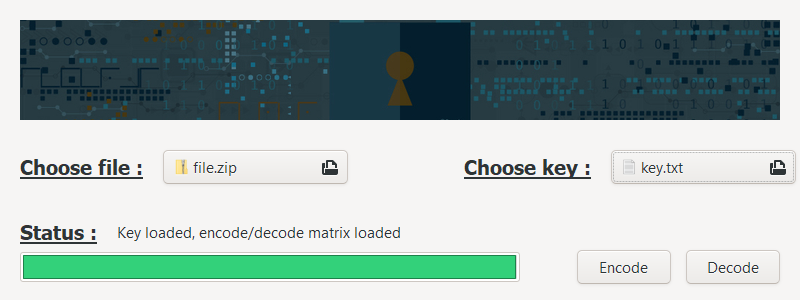
Start the encoding process
Press the Encode button (no kidding! :upside_down_face:).
The program interface will freeze during the process but don't panic, it's working.

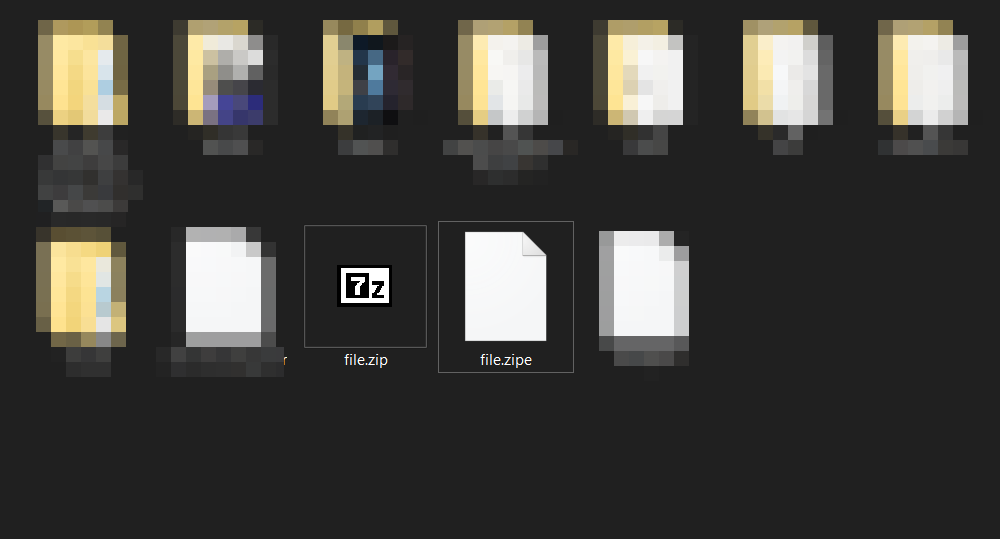
The encoded file is saved in the same folder than the original one, and the letter e (for "encoded") is added at the end of the file extension.
Start the decoding process
Press the Decode button (haha again, no kidding! :upside_down_face:).
The program interface will freeze during the process but don't panic, it's working.
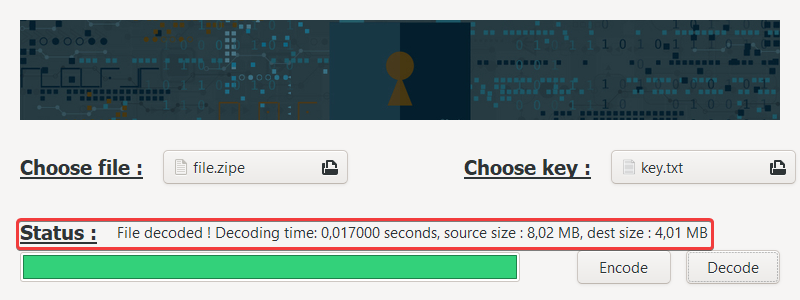
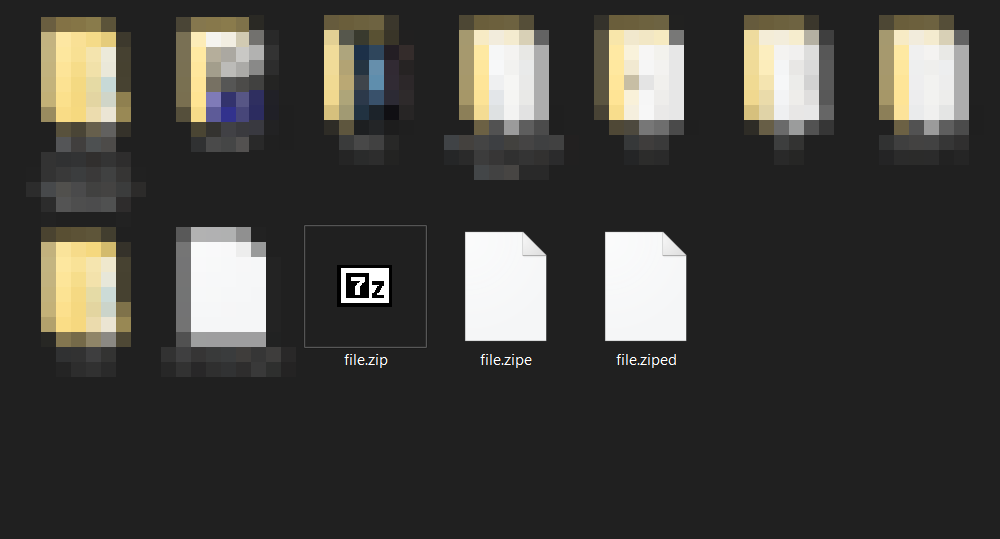
The decoded file is saved in the same folder than the original one, and the letter d (for "decoded") is added at the end of the file extension.
Warning ⚠️⚠️⚠️ !!!
In both cases, you will need to have MinGW installed with GTK+3.20 at least.
I didn't figured out how to compile it in static in all-in-one executable file yet...
Using msys2
Here's the command to execute inside msys2 to be able to compile this project:
pacman -Syu
pacman -S mingw-w64-x86_64-gcc
pacman -S mingw-w64-x86_64-gtk3
Then, you need to link the msys2/mingw64/bin folder to your system environment variable PATH.
During the build, if some libraries are not found, go to the folder msys2/mingw64/include and copy them outside of the version folder:
Exemple: copy gtk and gdk folder inside msys2/mingw64/include/gtk-3-0/ directly inside msys2/mingw64/include/
Code: how the program works
Loading the key
First of all, we need to load our key otherwise the program won't start the encoding / decoding process.
The key must be in valid format and will be stored in a local array char codecKey[4][8].
The function int readKey(const char *path) in codecFunction.c opens the key text file and first checks the valid format of the key:
int readKey(const char *path) {
...
char c1[9], c2[9], c3[9], c4[9];
...
if (fscanf(fp, "G4C=[%[01] %[01] %[01] %[01]]", c1, c2, c3, c4) != 4)
...
if (strlen(c1) != 8 || strlen(c2) != 8 || strlen(c3) != 8 || strlen(c4) != 8)
Then, it stores the key in our codecKey[4][8] array:
for (i = 0; i < 8; ++i) {
codecKey[0][i] = c1[i] == '1' ? 1 : 0;
codecKey[1][i] = c2[i] == '1' ? 1 : 0;
codecKey[2][i] = c3[i] == '1' ? 1 : 0;
codecKey[3][i] = c4[i] == '1' ? 1 : 0;
}
...
}
Fill the encoding matrix table
During the encoding process, we don't want to process each byte of the file with the encoding method.
If we think about it, there are only 256 possible values for a byte (0 to 255), and each input byte will give two encoded bytes in the output: to speed the process, we will fill a local array unsigned char encodeMatrix[256][2] with all the possibilities.
Then, in our encoding process, we just access the correct index of the array which is the value of the byte!
The function int fillMatrixEncode() in codecFunction.c will process the 256 * 2 bytes possibilities depending on the key:
int fillMatrixEncode() {
char array1[8], array2[8];
int i, j;
for (i = 0; i < 256; ++i) {
for (j = 0; j < 8; ++j) {
array1[j] = (c2b[i][0] && codecKey[0][j]) ^ (c2b[i][1] && codecKey[1][j]) ^ (c2b[i][2] && codecKey[2][j]) ^
(c2b[i][3] && codecKey[3][j]);
array2[j] = (c2b[i][4] && codecKey[0][j]) ^ (c2b[i][5] && codecKey[1][j]) ^ (c2b[i][6] && codecKey[2][j]) ^
(c2b[i][7] && codecKey[3][j]);
}
encodeMatrix[i][0] = b2C(array1);
encodeMatrix[i][1] = b2C(array2);
}
return 0;
}
As we see, we process with a XOR function because a matrix product between bits is the same as XOR.
Fill the decoding matrix table
As for the encoding process, we don't want to process each byte of the file with the decoding method during the decoding process.
If we think about it, there are only 256 * 256 possible two-byte combinations: to speed the process, we fill a local array unsigned char decodeMatrix[256][256] with all the possibilities.
Then, during the decoding process, we just access the correct index of the first dimension of the array, which is the value of the first byte, then the correct index of the second dimension of the array, which is the value of the second byte!
The function int fillMatrixDecode() in codecFunction.c will process the 256 * 256 bytes possibilities depending on the key:
int fillMatrixDecode() {
...
char i4[5], matrixI4[4], byte[8];
for (i = 0; i < 8; i++) {
for (j = 0; j < 4; j++) {
i4[j] = codecKey[j][i];
}
i4[4] = '\0';
if (i4[0] == 1 && i4[1] == 0 && i4[2] == 0 && i4[3] == 0)
matrixI4[0] = i;
else if (i4[0] == 0 && i4[1] == 1 && i4[2] == 0 && i4[3] == 0)
matrixI4[1] = i;
else if (i4[0] == 0 && i4[1] == 0 && i4[2] == 1 && i4[3] == 0)
matrixI4[2] = i;
else if (i4[0] == 0 && i4[1] == 0 && i4[2] == 0 && i4[3] == 1)
matrixI4[3] = i;
}
As explained in the decoding theoretical section, the first step is to find our identity matrix in our G4C matrix columns. Once we have it, we can continue:
for (i = 0; i < 256; i++) {
for (j = 0; j < 256; j++) {
for (k = 0; k < 4; k++) {
byte[k] = c2b[i][matrixI4[k]];
}
for (k = 0; k < 4; k++) {
byte[k + 4] = c2b[j][matrixI4[k]];
}
decodeMatrix[i][j] = b2C(byte);
}
}
return 0;
}
As we see, we fill our two dimensional array with all the possibilities, depending on our identity matrix.
File encoding process
For this part, we will just focus on the part where we read / write bytes, the rest of the function is just classic file processing.
The function int encode() in codecFunction.c will open the source file, create the encoded destination file and fill it with encoded bytes.
The treatment is faster if done in memory, so we will use 4 different buffer sizes, depending on the file size (10MB, 1MB, 1KB, 1B). Each buffer has the same working process so let's see one of them:
int encode() {
...
if (size2 >= 10485760) {
readBufferSize = 10485760;
writeBufferSize = readBufferSize * 2;
readBuffer = malloc(readBufferSize);
writeBuffer = malloc(writeBufferSize);
while (size2 >= readBufferSize) {
size2 -= readBufferSize;
assert(fread(readBuffer, 1, readBufferSize, fp) == readBufferSize);
pthread_create(threads, NULL, worker1, NULL);
pthread_create(threads + 1, NULL, worker2, NULL);
pthread_join(threads[0], NULL);
pthread_join(threads[1], NULL);
assert(fwrite(writeBuffer, 1, writeBufferSize, dest) == writeBufferSize);
}
}
When initialized, size2 is the size of the source file and will be decremented every time we process the file: this allows us to know how many bytes are left to process. The readBuffer array contains the bytes we read from the source file, and the writeBuffer array will contain the encoded bytes: as a source byte generates two encoded bytes, it will be twice bigger as the readBuffer size.
To fill writeBuffer, we use two threads: the first one fills the writeBuffer array with the first encoded byte, and the second one fills it with the second encoded byte. Each of these threads calls a worker function:
void *worker1() {
for (int i = 0; i < readBufferSize; ++i) {
writeBuffer[i * 2] = encodeMatrix[readBuffer[i]][0];
}
return (NULL);
}
void *worker2() {
for (int i = 0; i < readBufferSize; ++i) {
writeBuffer[i * 2 + 1] = encodeMatrix[readBuffer[i]][1];
}
return (NULL);
}
Once all of the bytes are processed, we just free the buffers and close the source and destination files.
File decoding process
As for the file encoding process, we will just focus on the part where we read / write bytes, the rest of the function is just classic file processing.
The function int decode() in codecFunction.c will open the encoded source file, create the decoded destination file and fill it with decoded bytes.
Once again, the treatment is faster when done in memory, so we will use 4 different buffer sizes, depending on the file size (20MB, 2MB, 2KB, 2B: these values are twice bigger as the encoding buffer sizes since two encoded bytes are necessary to get a decoded byte).
Each buffer has the same working process so let's see one of them:
if (size2 > 20971520) {
readBufferSize = 20971520;
writeBufferSize = readBufferSize / 2;
readBuffer = realloc(readBuffer, readBufferSize);
writeBuffer = realloc(writeBuffer, writeBufferSize);
while (size2 >= readBufferSize) {
size2 -= readBufferSize;
assert(fread(readBuffer, 1, readBufferSize, fp) == readBufferSize);
for (i = 0; i < writeBufferSize; i++) {
writeBuffer[i] = decodeMatrix[readBuffer[i * 2]][readBuffer[i * 2 + 1]];
}
assert(fwrite(writeBuffer, 1, writeBufferSize, dest) == writeBufferSize);
}
}
When initialized, size2 is the size of the source file and will be decremented every time we process the file: this allows us to know how many bytes are left to process. The readBuffer array contains the bytes we read from the source file, and the writeBuffer array will contain the decoded bytes: it will be half the size of readBuffer.
To fill writeBuffer, we just read the readBuffer bytes two by two and use them as index of our decodeMatrix.
Once all of the bytes are processed, we just free the buffers and close the source and destination files.
Fixing the cross-compilation issue
If we want to compile on both Linux and Windows, we have an issue with the fseek() and ftell() functions that are used to determine the size of the source file.
Indeed, on Windows, ftell() only returns and int type value: if the source file size is higher than 2 147 483 647 bytes (~ 2.14 GB), it will return -1 on size_t size, which is unsigned type. This problem is not present on Linux because ftell() returns a long type value, which is enough.
To fix this problem on Windows, we can use the _fseeki64() and _ftelli64() functions from MinGW that return a long long type value, but these functions are not available on Linux.
The solution is to use a compilation macro to determine the system that is running the program and which functions should be used:
#ifdef _WIN64
assert(!_fseeki64(fp, 0, SEEK_END));
size_t size = _ftelli64(fp);
assert(!_fseeki64(fp, 0, SEEK_SET));
#elif __linux__
assert(!fseek(fp, 0, SEEK_END));
size_t size = ftell(fp);
assert(!fseek(fp, 0, SEEK_SET));
#else
#error You need to compile on Linux or Windows 64bits
#endif
Contributing
If someone has an idea on how to compile in static with GTK or stuffs to be dependence free, be my guest!
Authors
This project was carried out by myself :sunglasses:.
| Noé LARRIEU-LACOSTE | |
|---|
CXML
CXML
 |
 |
|
|---|---|---|
INTRODUCTION
RAPPEL DU SUJET
Pour recontextualiser, le lancement du projet a eu lieu à l'issue de la piscine de C.
Pour ce projet, nous devons réaliser une application en C permettant de valider des fichiers XML à l'aide d'une DTD.
Nous devons construire un ensemble de fonction permettant dans un premier temps de tester si les éléments d'un fichier xml sont conformes à la DTD, ainsi que de vérifier si le fichier XML est correct.
Nous devons ensuite prendre en compte la validation des attributs afin qu'ils soient conformes à la DTD. Il faut également vérifier si le fichier XML est correct, sans limites de profondeur.
Enfin, il faut réaliser un éditeur graphique de DTD afin de valider directement un fichier XML depuis une interface développée avec GTK. Cette interface devra également être capable de proposer des suggestions lors de l'écriture du fichier XML.
FOCUS SUR L'APPLICATION
FONCTIONNALITÉS
Parser un fichier XML
Avant d'être une application permettant de valider un fichier XML, elle doit le comprendre,
l'analyser. C'est pour cela qu'une des principales fonctionnalités de l'application consiste à parser un fichier XML et le stocker à l'aide de structures de données. Cela nous apporte plusieurs avantages : Avoir un document structuré dans notre code afin de mieux naviguer dedans La limite de profondeur n'est plus un problème
Nous pouvons au moment où nous parsons un document détecter les erreurs de syntaxes
Parser un fichier DTD
De la même manière que nous parsons un fichier XML, nous parsons un fichier DTD. En effet, le parsing d'un fichier DTD est plus ou moins semblable au parsing d'un fichier XML, le principe reste le même.
Au moyen de structure de données conçues spécialement pour un fichier DTD dont nous détaillerons l'utilisation plus tard dans le document, nous stockons toutes les données issues du fichier.
C'est pourquoi certains avantages constatés pour le parsing d'un fichier XML sont également applicables dans le cas d'un fichier DTD.
Vérification syntaxique du fichier XML
Lorsque nous parsons notre fichier XML pour le stocker, il faut que le fichier XML soit correct pour ne pas créer d'erreur.
Nous avons donc dû implémenter une série de règles afin de vérifier que notre document est correct.
Voici une liste non exhaustive de certaines de ces règles :
- Une seule balise à la racine du document
- La balise <?xml, si elle existe, doit être au tout début du document
- Un texte doit forcément être à l'intérieur d'une balise et non à la racine du document
- Toute balise ouverte doit être fermée
- Les balises fermantes doivent porter le même nom que les balises ouvrantes du même niveau
- Les commentaires doivent bien respecter la syntaxe, à savoir <!--Commentaire -->
- Tout attribut doit posséder une clé et une valeur
- La valeur d'un attribut peut être en simple quote ou double quote
- Le premier caractère d'une balise doit forcément être un caractère virgule et les suivants doivent être soit des caractères, soit des chiffres, soit certains caractères spéciaux très spécifiques ( -, _ )
Si une seule de ces règles n'est pas respecté, cela coupe le processus de parsing, indique dans l'application ainsi que dans un fichier log.txt la ligne, la colonne ainsi que la nature de l'erreur.
Un code erreur est alors renvoyé.
Vérification syntaxique du fichier DTD
Bien que ce ne soit pas indiqué explicitement dans le sujet que nous devons vérifier la syntaxe du fichier DTD, nous avons choisi de le faire.
Ainsi notre application avant de vérifier si le fichier XML est correct comme demandé dans l'énoncé du projet, vérifie d'abord la conformité du fichier DTD.
Une analyse syntaxique est réalisée afin de desceller de potentielles erreurs.
Par conséquent, notre application gère à la fois les erreurs au niveau du fichier XML, mais également les potentielles erreurs du fichier DTD.
Voici une liste non exhaustive de certaines de ces règles :
- La règle DOCTYPE ne doit contenir le nom que d'une seule balise
- Une règle concernant un élément doit avoir sa règle entre parenthèses
- Les éléments présents dans la parenthèse d'une règle ELEMENT doivent être séparées par des caractères spécifique : | ou ,
- Il doit forcément il y avoir un élément après | ou chaque balise ouverte doit être fermée par >
- Les parenthèses ne peuvent pas être vides
- Les éléments contenus dans la parenthèse et séparés ne peuvent pas être composés de plusieurs mots
- Sur une règle concernant un attribut (ATTLIST) il faut forcément qu'il y ait une option commençant par # tel que #REQUIRED ou #IMPLIED
Validation de la conformité d'un fichier XML depuis une DTD externe
C'est donc à partir d'une DTD externe que nous vérifions si le fichier XML est correct ou non.
Nous allons donc charger dans des structures de données notre document XML et DTD.
À partir de cela, nous allons itérer sur les règles DTD pour valider notre document XML, à savoir :
- Vérifier la syntaxe du fichier XML et DTD au moment du parsing
- Valider le DOCTYPE (première balise) du document XML en accord avec la règle DTD si celle-ci est présente
- Valider les règles DTD concernant les éléments du fichier XML ainsi que leur contenu
- Valider les règles DTD concernant les attributs d'un élément XML ainsi que leur contenu
CHOIX D'IMPLEMENTATIONS
DTD externe
Pour une meilleure répartition des tâches et afin de prendre une décision dès le début du projet, il a été décidé que notre application serait conçue pour valider un document XML depuis une DTD externe.
Cela signifie que la DTD doit être dans un fichier à part (avec l'extension dtd) et non au début du fichier XML.
Parser le fichier XML et DTD
Nous ne savons pas s'il y a d'autres approches possibles pour valider un document XML, mais nous avons fait le choix de parser nos documents afin de pouvoir vérifier leurs conformités, mais aussi, car cela nous semblait plus simple aussi pour itérer sur chaque règle DTD et naviguer dans le document XML, peu importe la profondeur.
Cross plateforme
Parce qu'un programme qui fonctionne sur un système d'exploitation, c'est bien, un programme qui fonctionne sur plusieurs systèmes d'exploitation, c'est mieux !
Nous avons souhaité faire en sorte que tout notre programme soit compilable aussi bien sur le système Windows que Linux.
Cela impliquait d'être vigilant par rapport aux dépendances, qui peuvent varier d'un système à l'autre, surtout GTK qui fait bien transpirer sur Windows...
Projet CMAKE
CMake (Cross platform Make) est un outil open source permettant de gérer la compilation d'un projet C/C++ sur différente plateformes.
C'est beaucoup plus simple que de devoir compiler à la main avec GCC, et permet de créer des scripts avancés, qui vont beaucoup aider pour lier des librairies à notre projet et aussi faire une application cross plateforme.
L'outil est bien pris en charge dans l'IDE Clion, éditeur que nous utilisons pour développer notre application.
STRUCTURES DE DONNEES
Pour que notre application fonctionne correctement, notamment au niveau du parsing, il a fallu créer différentes structures de données afin d'ordonner notre code.
DTD Parser
typedef struct dtd_document_s dtd_document;
struct dtd_document_s {
char *source;
char *root_node;
element_node *first_element_node;
attribute_node *first_attribute_node;
};
Cette structure est notre point d'entrée vers notre document DTD.
Les champs suivants représentent :
- Char *source : contient sous forme de chaine de caractère l'intégralité de notre fichier DTD.
- Char *root_node : correspond au nom que doit avoir la première balise du document XML (!DOCTYPE). Si ça n'est pas indiqué, la variable vaut NULL.
- Element_node *first_element_node :premier élément de notre liste chainée contenant les règles sur les éléments
- Attribute node *first_attribute_node : premier élément de notre liste chainée contenant les règles sur les attributs
typedef struct element_node_s element_node;
struct element_node_s {
char *tag_name;
char *rule_type;
dtd_rule *rule;
struct element_node_s *next;
};
Cette structure fonctionne comme une liste chainée contenant toutes les règles sur les éléments d'un fichier DTD.
Les champs suivants représentent :
- Char *tag_name : correspond au nom de la/les balise(s) concernée(s) par la règle
- Char *rule_type : type de règle, en l'occurrence !ELEMENT
- Dtd_rule *rule : premier élément de notre liste chainée contenant le détail des règles pour l'élément concerné
- Element_node *next : prochaine règle concernant un élément. Si c'est la dernière règle, *next vaudra alors NULL
typedef struct dtd_rule_s dtd_rule;
struct dtd_rule_s {
char *rule_name;
char rule_spec;
char rule_sep;
struct dtd_rule_s *next;
};
Dans le cas d'une règle pour les éléments, il peut y avoir différents éléments dans la parenthèse, séparé par différents caractères.
Les champs suivants représentent :
- Char *rule_name : le nom de l'élément enfant, ou bien #PCDATA
- Char rule_spec : la répétition de l'élément (+, ?,*)
- Char rule_sep : la séparation avec la règle suivante (, | )
- Dtd_rule *next : prochaine règle. Si c'est la dernière règle, *next vaudra alors NULL
typedef struct attribute_node_s attribute_node;
struct attribute_node_s {
char *rule_type;
char *element_name;
char *attribute_name;
char *attribute_type;
char *attribute_option;
struct attribute_node_s *next;
};
Cette structure fonctionne comme une liste chainée contenant toutes les règles sur les attributs d'un fichier DTD.
Les champs suivants représentent :
- Char *rule_type : type de règle, en l'occurrence « !ATTLIST»
- Char *element_name : nom de la balise concernée dans le document XML
- Char *attribute_name : nom de l'attribut concerné.
- Char *attribute_type : contient la règle sur le contenu de l'attribut comme (H | F) ou encore CDATA
- Char *attribute_option : contient l'option de la règle, comme #REQUIRED ou encore #IMPLIED
- Attribute_node *next : prochaine règle concernant un attribut. Si c'est la dernière règle, *next vaudra alors NULL
XML Parser
typedef struct xml_document_s xml_document;
struct xml_document_s {
char *source;
char *version;
char *encoding;
xml_node *root_node;
};
Cette structure est notre point d'entrée vers notre document XML.
Les champs suivants représentent :
- Char *source : contient sous forme de chaine de caractère l'intégralité de notre fichier XML.
- Char *version : contient la version du document si elle a été renseignée, sinon vaut NULL
- Char *encoding : contient l'encodage du document si ça a été renseignée, sinon vaut NULL
- Xml_node *root_node : correspond à la première balise de notre document XML.
typedef struct xml_node_s xml_node;
struct xml_node_s {
char *tag;
char *inner_text;
xml_node *parent;
xml_attribute_list attribute_list;
xml_node_list children;
};
Cette structure représente une balise XML ainsi que son contenu.
Les champs suivants représentent :
- Char *tag : le nom de la balise XML
- Char *inner_text : le texte à l'intérieur de la balise s'il y en a, sinon vaut NULL
- Xml_node *parent : la balise parente, si c'est la première balise du document, vaut NULL
- Xml_attribute_list attribute_list : contient les informations sur les attributs de la balise.
- Xml_node_list children : contient les informations sur les balises enfantées de celle-ci.
typedef struct xml_attribute_list_s xml_attribute_list;
struct xml_attribute_list_s {
int capacity;
int size;
xml_attribute *data;
};
Contient les informations sur les attributs d'une balise.
Les champs suivants représentent :
- Int capacity : capacité de notre tableau d'attributs
- Int size : nombre d'attributs
- Xml_attribute *data : tableau d'attributs
typedef struct xml_attribute_s xml_attribute;
struct xml_attribute_s {
char *key;
char *value;
};
Contient les informations d'un attribut.
Les champs suivants représentent :
- Char *key : la clé de l'attribut
- Char *value : le contenu de l'attribut
typedef struct xml_node_list_s xml_node_list;
struct xml_node_list_s {
int capacity;
int size;
xml_node **data;
};
Contient les informations sur les enfants d'une balise.
Les champs suivants représentent :
- Int capacity : capacité de notre tableau d'enfants
- Int size : nombre d'enfants
- Xml_node **data : tableau de balises XML
GTK
Pour GTK, il est utile de créer une structure de données regroupant tous les widgets de notre interface. De cette manière, à l'aide d'une variable statique que nous initialisons au début du programme pour connecter chacun des widgets au pointeur associé, nous pouvons interagir avec n'importe quel widget depuis n'importe où dans notre code.
typedef struct {
GtkWidget *window;
GtkButton *validateButton;
GtkButton *flushButton;
GtkFileChooserButton *xmlFileChooserButton;
GtkFileChooserButton *dtdFileChooserButton;
GtkLabel *statusLabel;
GtkTextBuffer *consoleTextBuffer;
GtkTextView *consoleTextView;
GtkScrolledWindow *scrollableWindow;
} App_widgets;
static App_widgets *widgets;
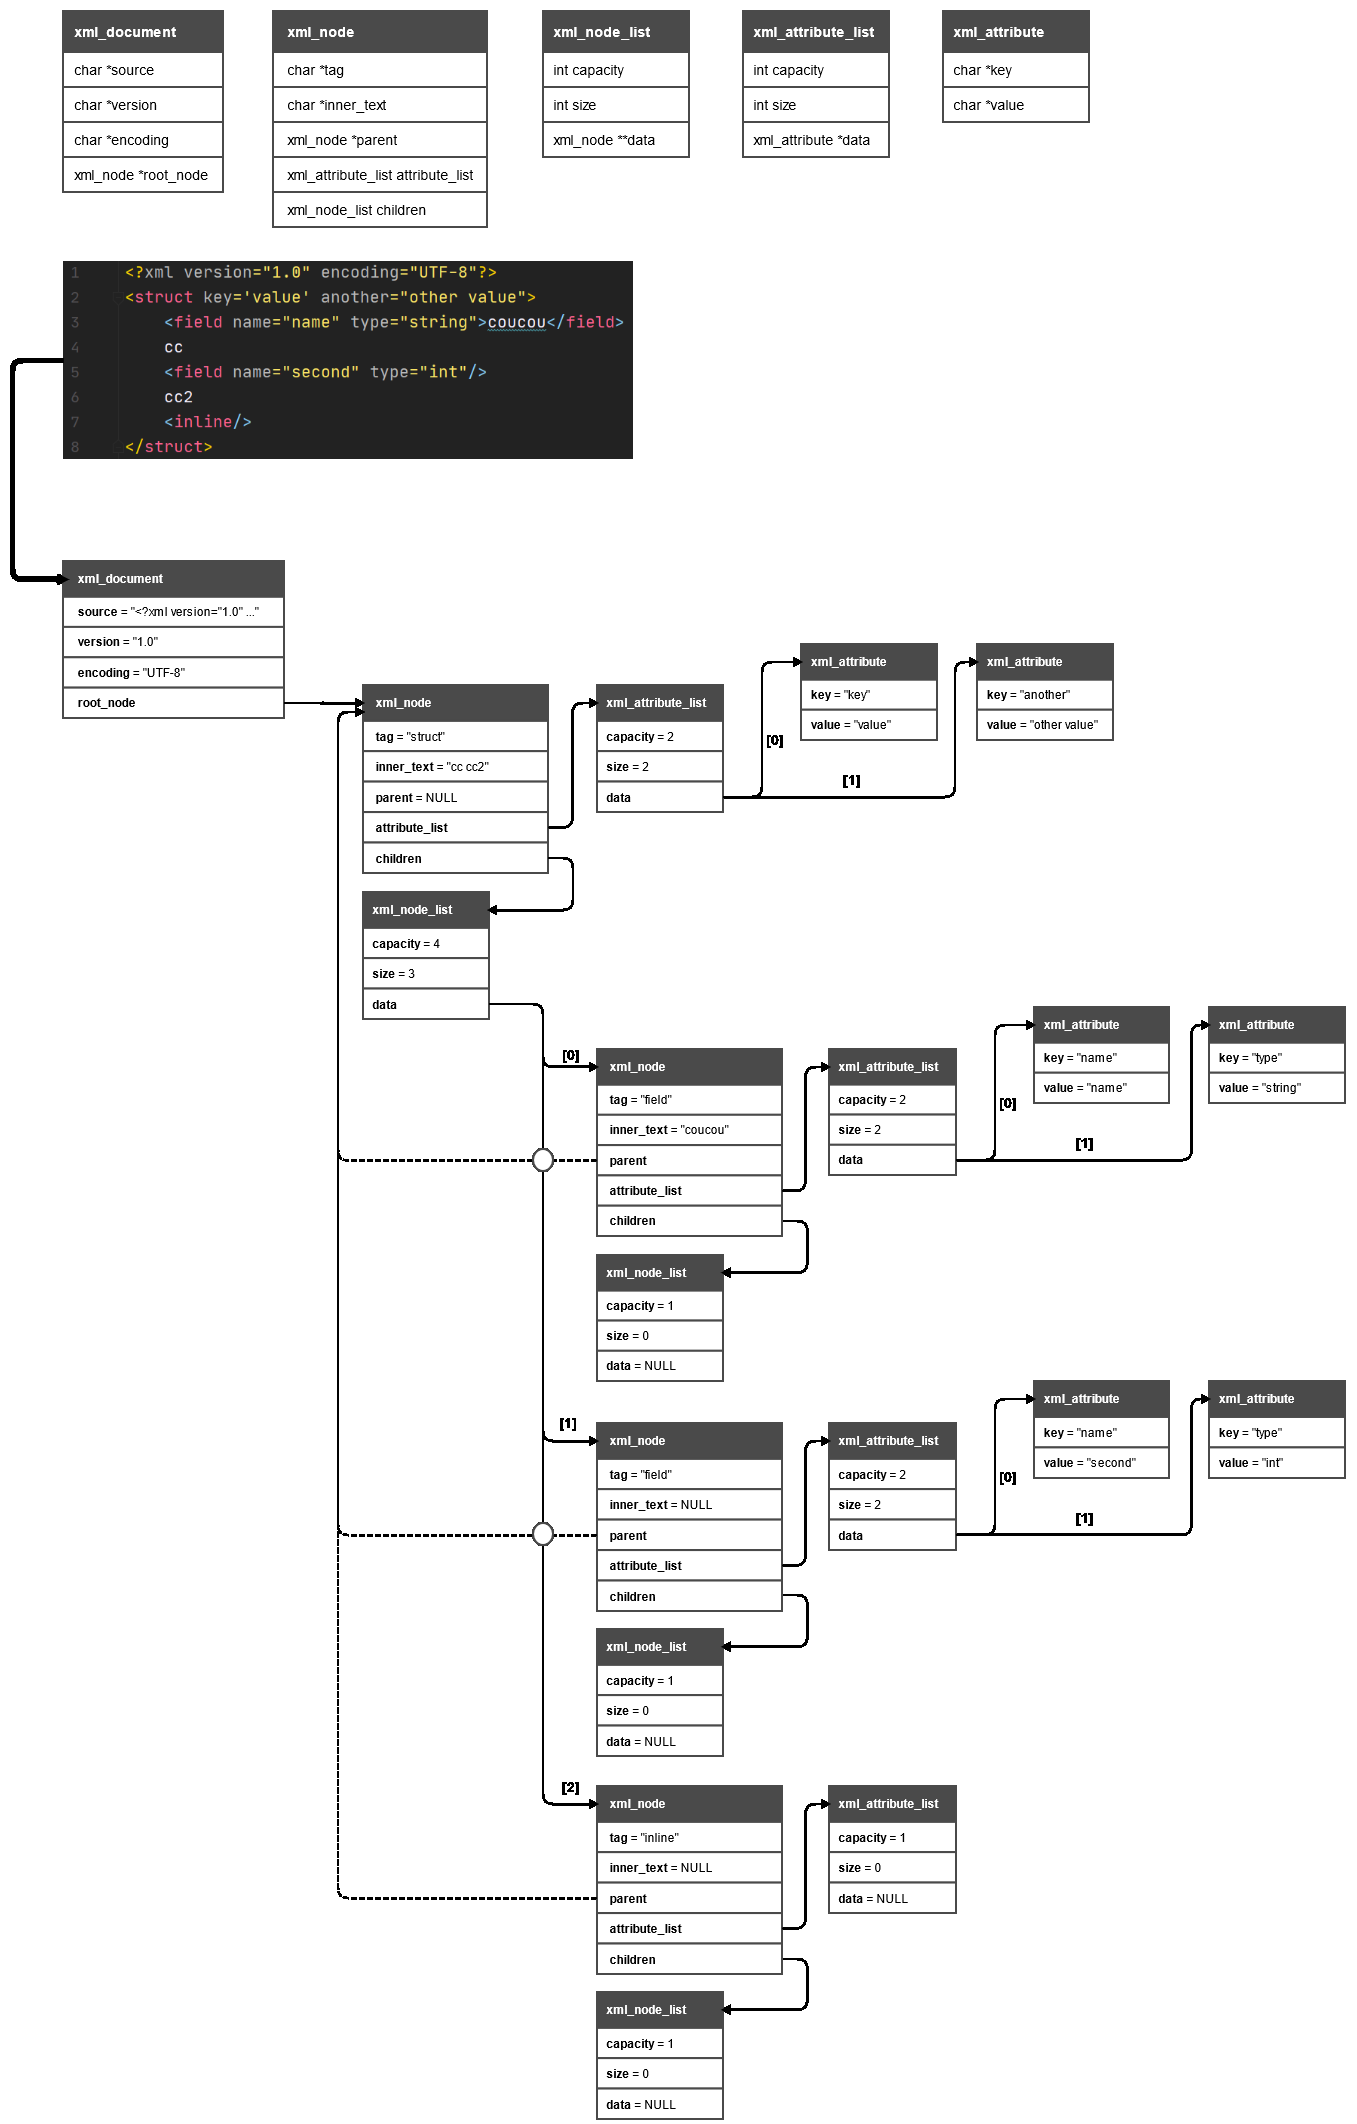
SCHEMA XML
Ceci est la représentation graphique de la manière dont le parseur XML traite le document et créé un ensemble de structure de données représentant notre document XML.
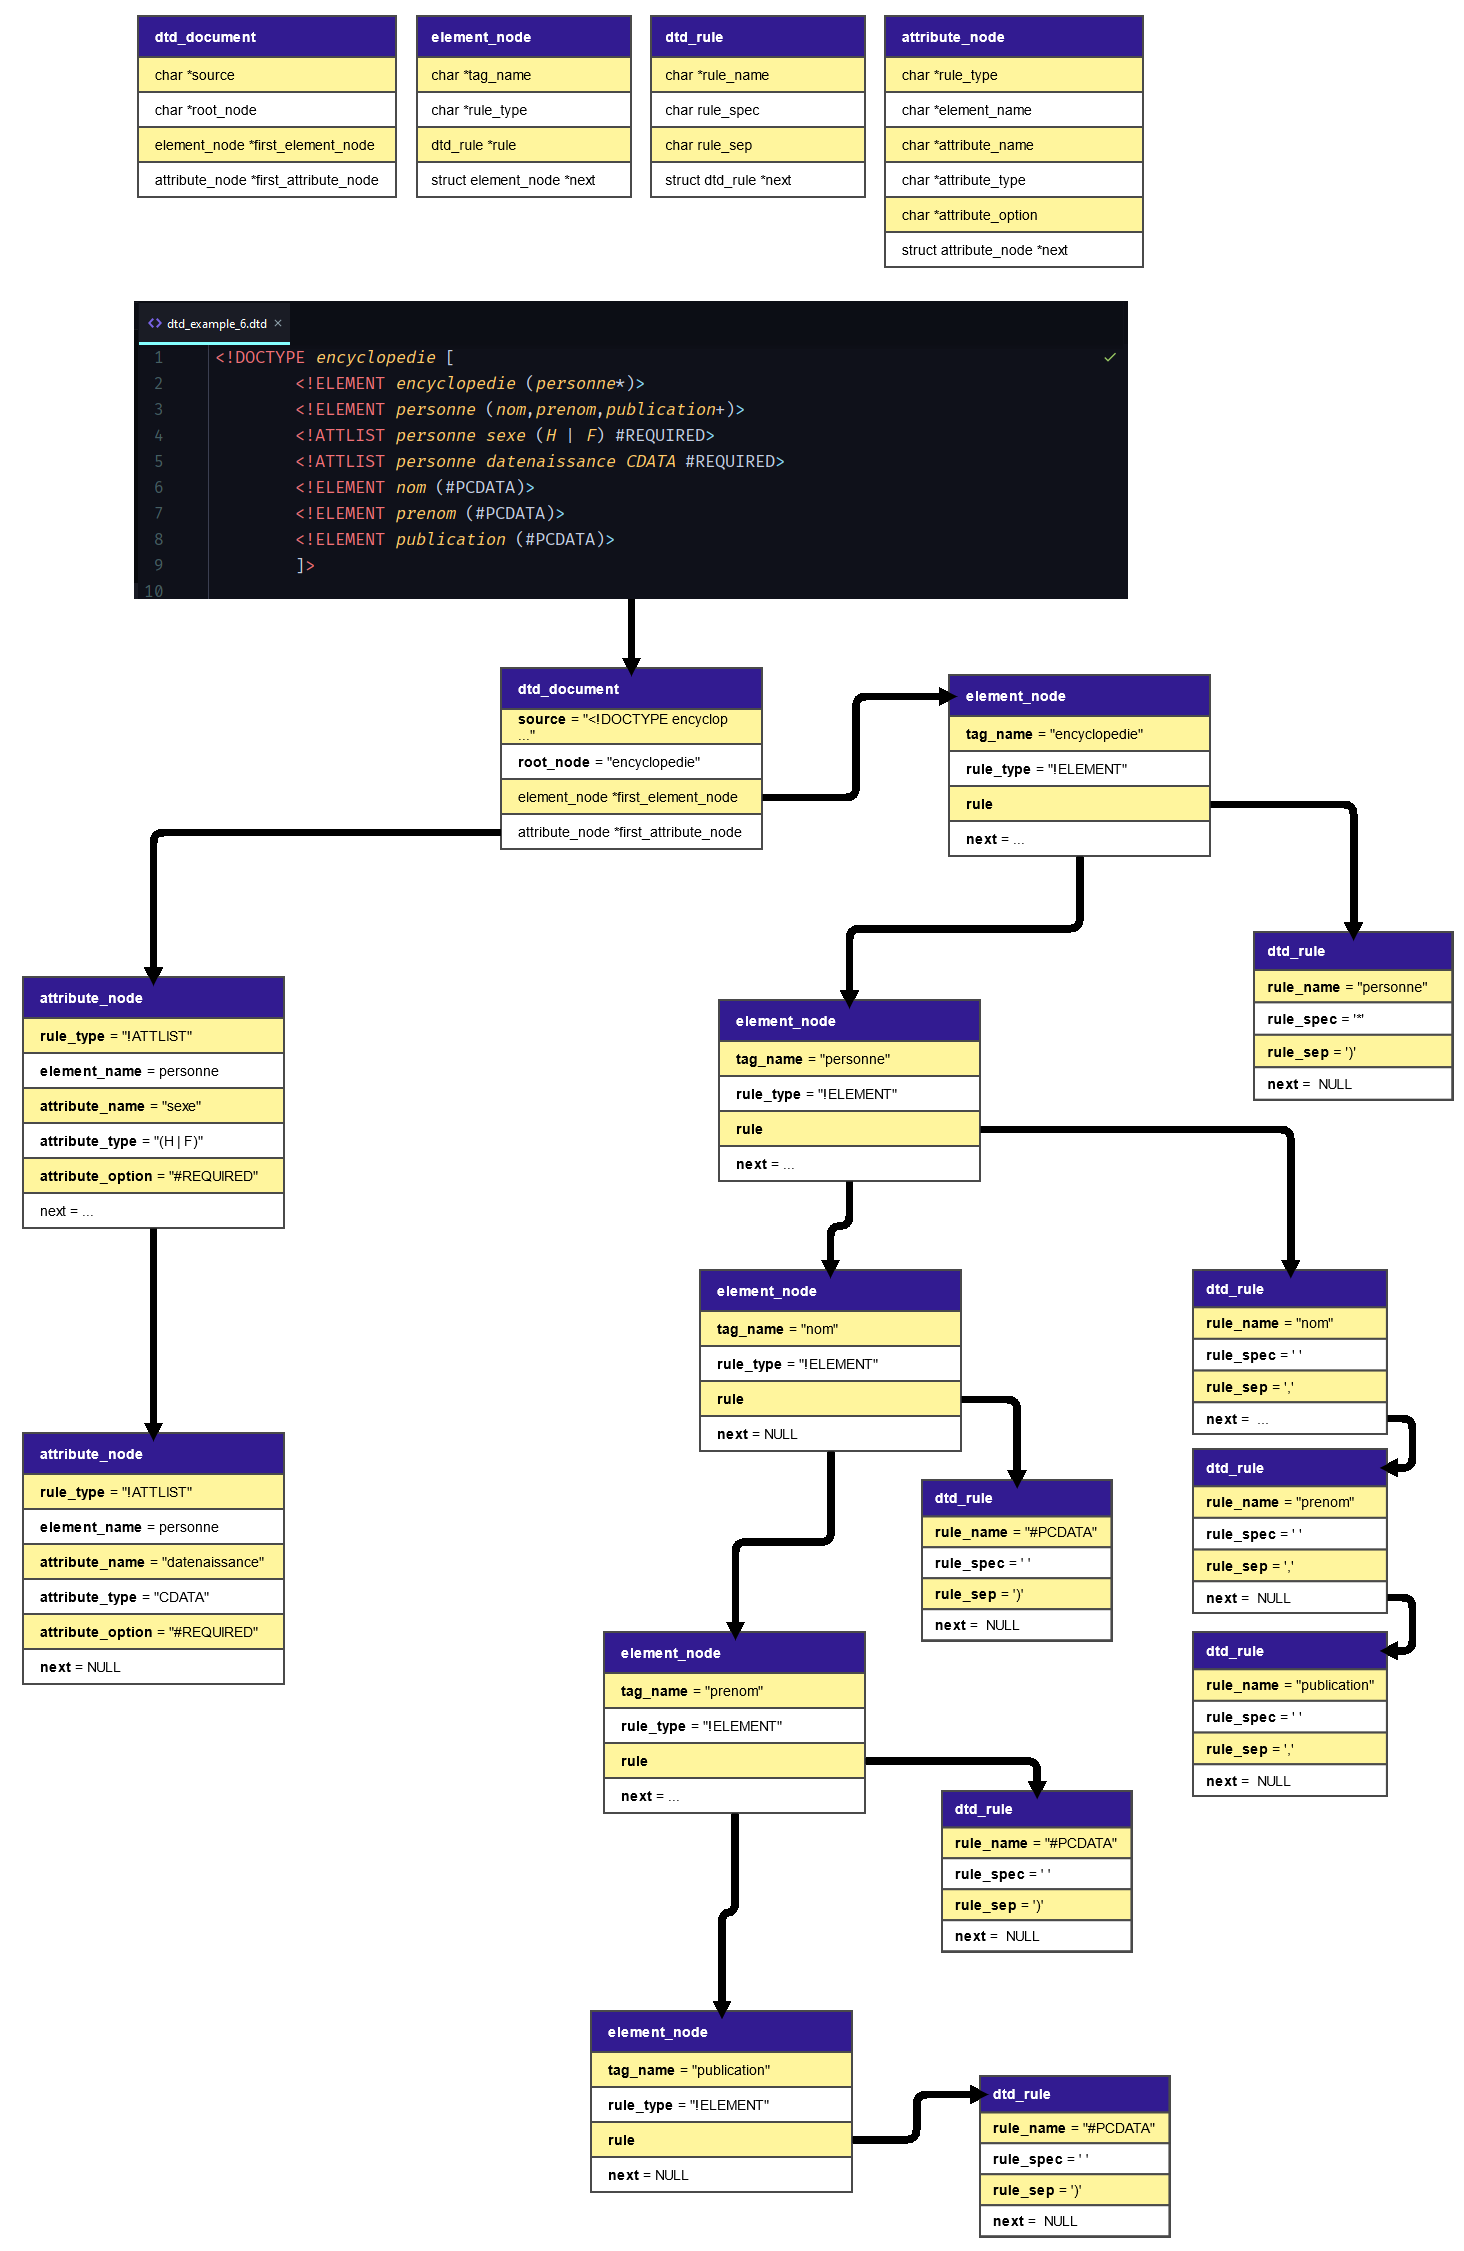
SCHEMA DTD
Ceci est la représentation graphique de la manière dont le parseur DTD traite le document et créé un ensemble de structure de données représentant notre document DTD.
FONCTIONS PRINCIPALES
Menu en ligne de commande
L'application comporte un menu_cli qui est simple. Le menu se décompose en 2 parties.
L'utilisateur doit choisir d'un côté le fichier XML et de l'autre le fichier DTD.
Ensuite, l'application vérifie si les fichiers existent dans les chemins que l'utilisateur fourni ainsi que l'extension des fichiers.
Si l'un des deux fichiers n'est pas correct, l'application affiche une erreur et demande à saisir de nouveau le chemin d'accès.
Il envoie ensuite les informations à la méthode de validation.
Parse DTD
Comme son nom l'indique la fonction parse_dtd nous permet de parser le document DTD.
C'est une fonction primordiale dans notre application, car elle nous permet d'une part de parcourir le fichier DTD mais également de vérifier qu'il ne comporte pas d'erreurs de syntaxe.
Ci-joint la définition de cette méthode :
int parse_dtd(dtd_document *document);
Comme on peut le voir cette fonction prend en paramètre une variable de type dtd_document ce qui correspond à notre structure dtd_document_s et renvoie un entier.
Pour comprendre pourquoi, ci-joint la déclaration de cette méthode :
int parse_dtd(dtd_document *document) {
size_t size = strlen(document->source);
if (is_doctype(document, size)) {
return doctype_process(&document, size);
} else {
return no_doctype_process(&document, size);
}
return 0;
}
Étant donné qu'un fichier DTD peut comporter ou non la déclaration DOCTYPE!, la fonction parse_dtd gèrent les deux possibilités.
C'est la méthode is_doctype(document, size) qui le détermine en recherchant la présence de la chaine DOCTYPE! dans le fichier.
Les méthodes doctype_process et no_doctype_process sont très semblables, mais quoi qu'il en soit à l'issue du parsing du fichier DTD les méthodes renvoient un entier, 1 s'il n'y a eu aucune erreur durant la compilation et 0 le cas échéant.
Parse xml
Le nom de cette fonction est également explicite.
Tout comme la méthode « parse_dtd » cette méthode renvoie l'entier '1' si l'exécution n'a rencontré aucun problème, 0 sinon et prend en paramètre une variable de type xml_document ce qui correspond à notre structure ** xml_document** et la taille du fichier XML.
Ci-joint la définition de cette méthode :
int parse_xml_file(xml_document *document, size_t size);
Validate dtd
C'est la fonction validate_dtd qui détermine si le fichier XML est conforme au fichier DTD, elle prend en paramètres le chemin vers le fichier XML ainsi que le chemin vers le fichier DTD.
Ci-joint la définition de la méthode :
int validate_dtd(const char *xml_path, const char *dtd_path);
Toute comme les méthodes de parsing, cette méthode renvoie l'entier '1' si l'exécution n'a rencontré aucun problème, 0 sinon.
Voilà comment la méthode peut être est appelée :
if (validate_dtd("xml_files/xml_example_6.xml", "dtd_files/dtd_example_6.dtd")) {
printf("DTD Test 1 valided\n");
}
DETAILS TECHNIQUES
Fichier log
Notre application comprend un fichier log qui nous permet d'obtenir et/ou d'afficher différentes informations relatives à l'utilisation de notre application.
Ce fichier s'avère très utile lorsqu'on souhaite comprendre l'origine d'une erreur. Dans notre cas tout cela est géré à l'aide d'un ensemble de méthodes.
Ci-joint les définitions des fonctions du fichier log.h
int setLogFileName(char *filename);
void logIt(char *message, int error);
void console_writeline(const char *text);
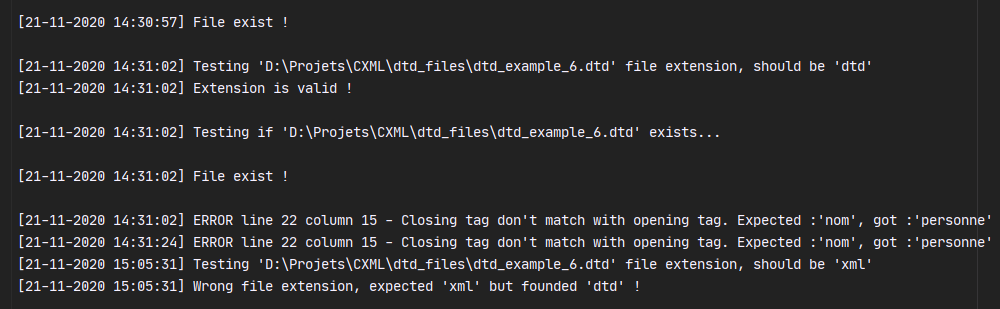
Voici un exemple de log, on y retrouve la date et l'heure. Lorsqu'une erreur est détectée, on remarque que la ligne et la colonne de l'erreur est renseigné.
CMake
CMake (Cross platform Make) est un outil open source permettant de gérer la compilation d'un projet C/C++ sur différente plateformes.
C'est beaucoup plus simple que de devoir compiler à la main avec GCC, et permet de créer des scripts avancer, qui vont beaucoup aider pour lier des librairies à notre projet et aussi faire une application cross-plateforme.
L'outil est bien pris en charge dans l'IDE Clion, éditeur que nous utilisons pour développer notre application.
DOSSIER D'INSTALLATION
PARTIE 1 A 3 (MENU LIGNE DE COMMANDES)
Pour installer l'application de la partie 1 à 3, rien de plus simple !
Il suffit de télécharger avec le lien suivant, selon la version que vous souhaitez :
- Partie 1 : https://github.com/Nouuu/CXML/releases/tag/Part_1_v2.5
- Partie 2 : https://github.com/Nouuu/CXML/releases/tag/Part_2_v1.5
- Partie 3 : https://github.com/Nouuu/CXML/releases
Choisir l'exécutable correspondant au système, cela est détaillé à chaque fois :
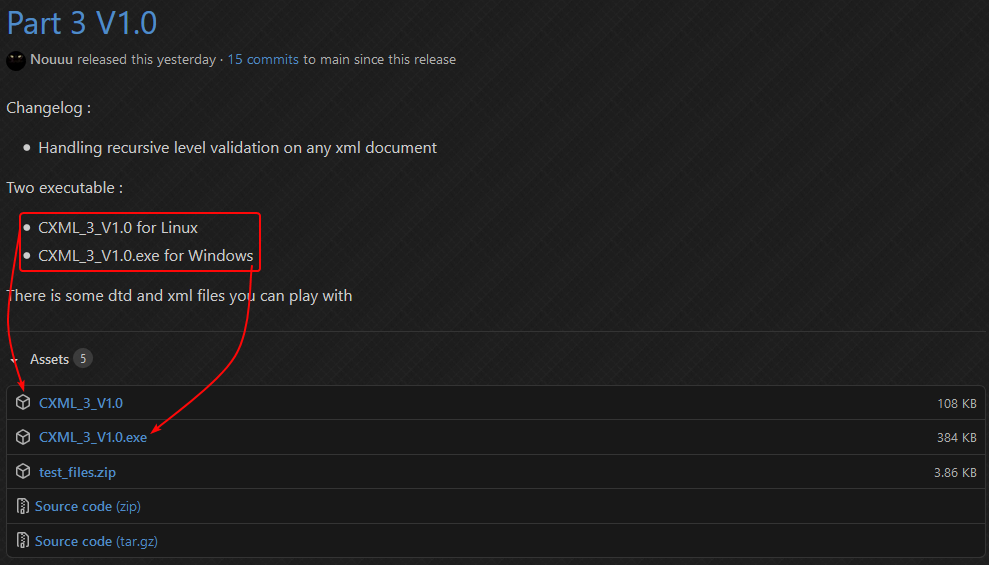
Il suffira alors de lancer l'exécutable (Cf : Dossier d'utilisation).
PARTIE 4 (APPLICATION INTERFACE GRAPHIQUE GTK)**
La partie 4 contient des fichiers pour faire fonctionner correctement GTK, et s'installe donc différemment.
Linux
Avant tout chose, vous devez installer sur votre poste la librairie GTK.
Pour cela, vous devez ouvrir une invite de commande avec les droits administrateurs et installer le paquet suivant :
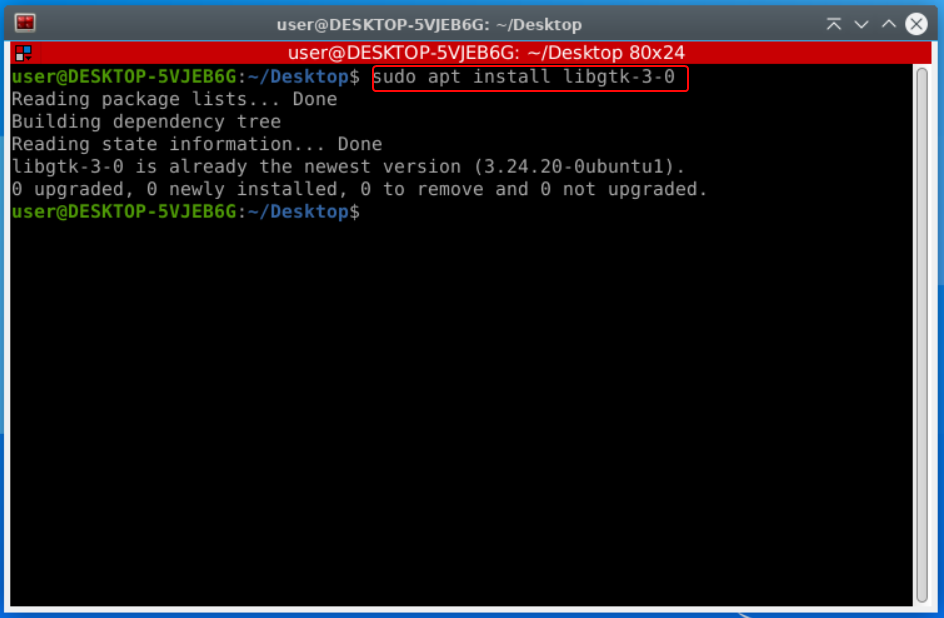
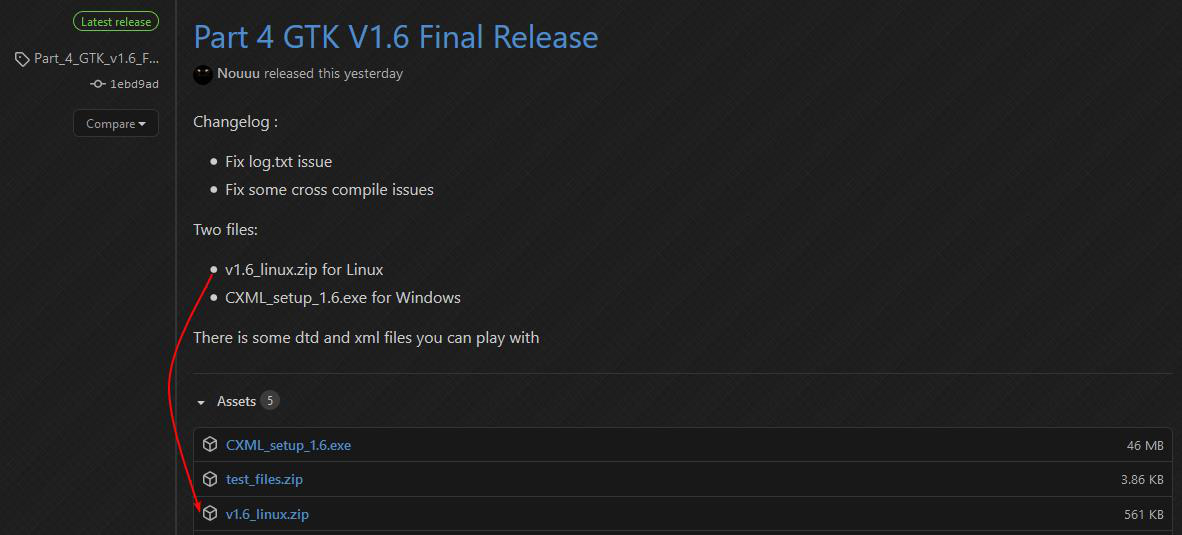
Vous pourrez télécharger ensuite l'archive de l'application depuis ce lien, en faisant attention à bien prendre la version pour Linux.
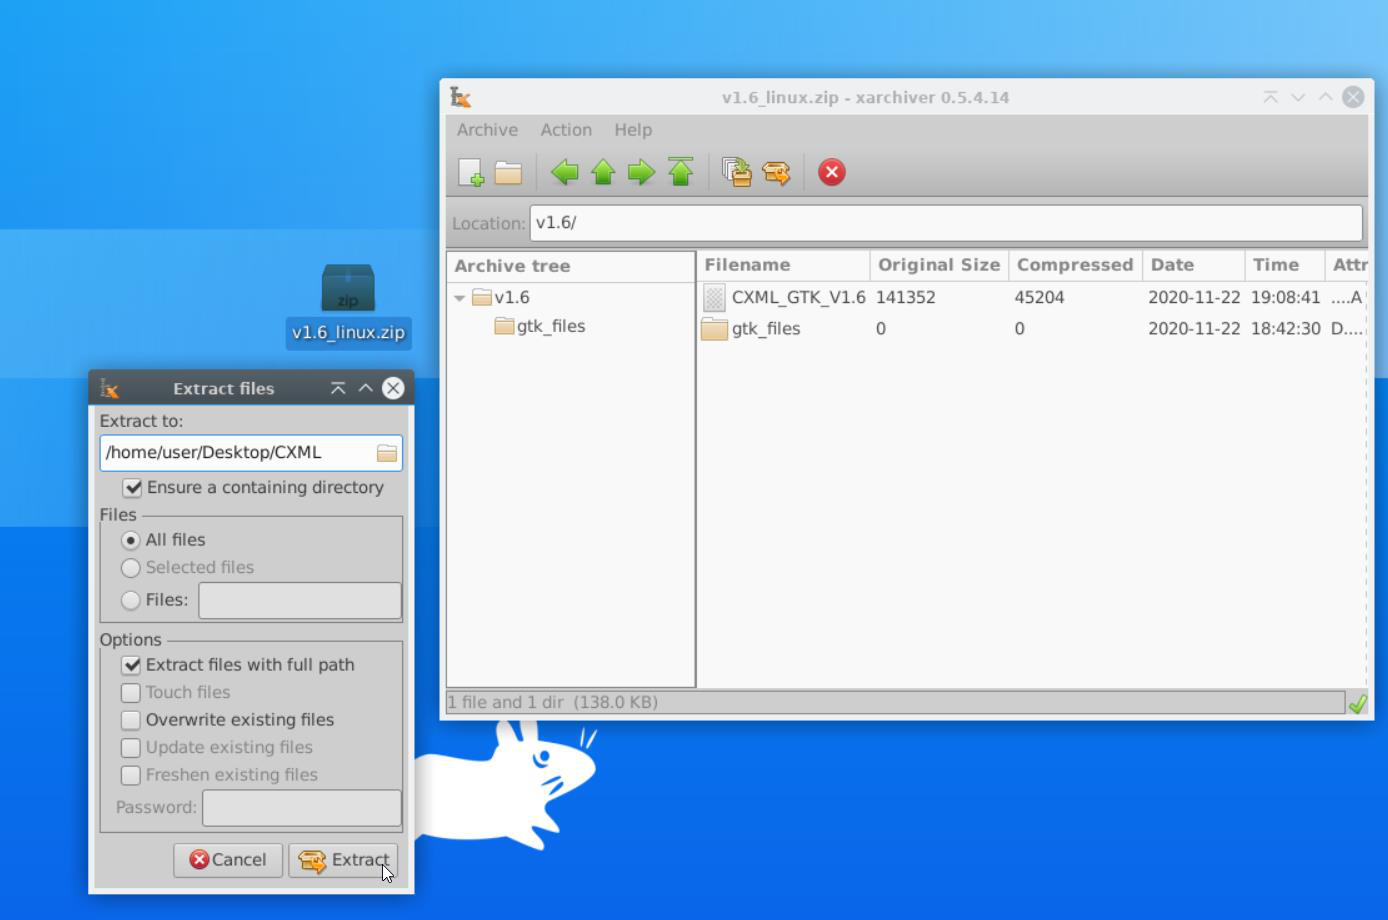
Une fois téléchargé, décompressez l'archive :
Rendez-vous ensuite à l'intérieur du dossier et ouvrez-y un terminal :
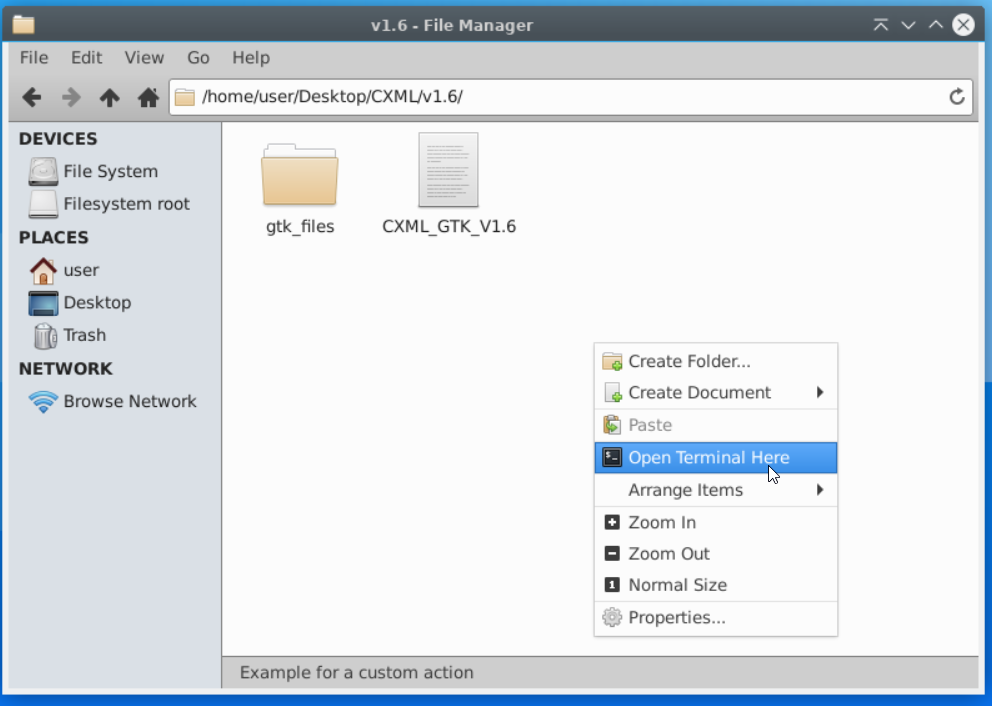
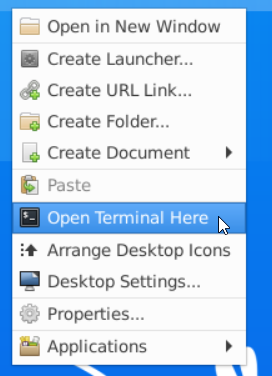
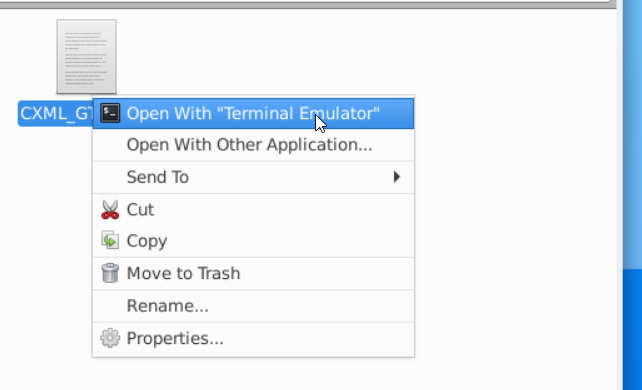
Enfin, exécutez la commande suivante pour rendre le lanceur d'application exécutable :

Vous pourrez alors faire un clic droit dessus et l'ouvrir avec un terminal :
Windows
Pour Windows (le meilleur OS), c'est beaucoup plus simple !
Vous pourrez télécharger l'installateur de l'application depuis ce lien, en faisant attention à bien prendre la version pour Windows.
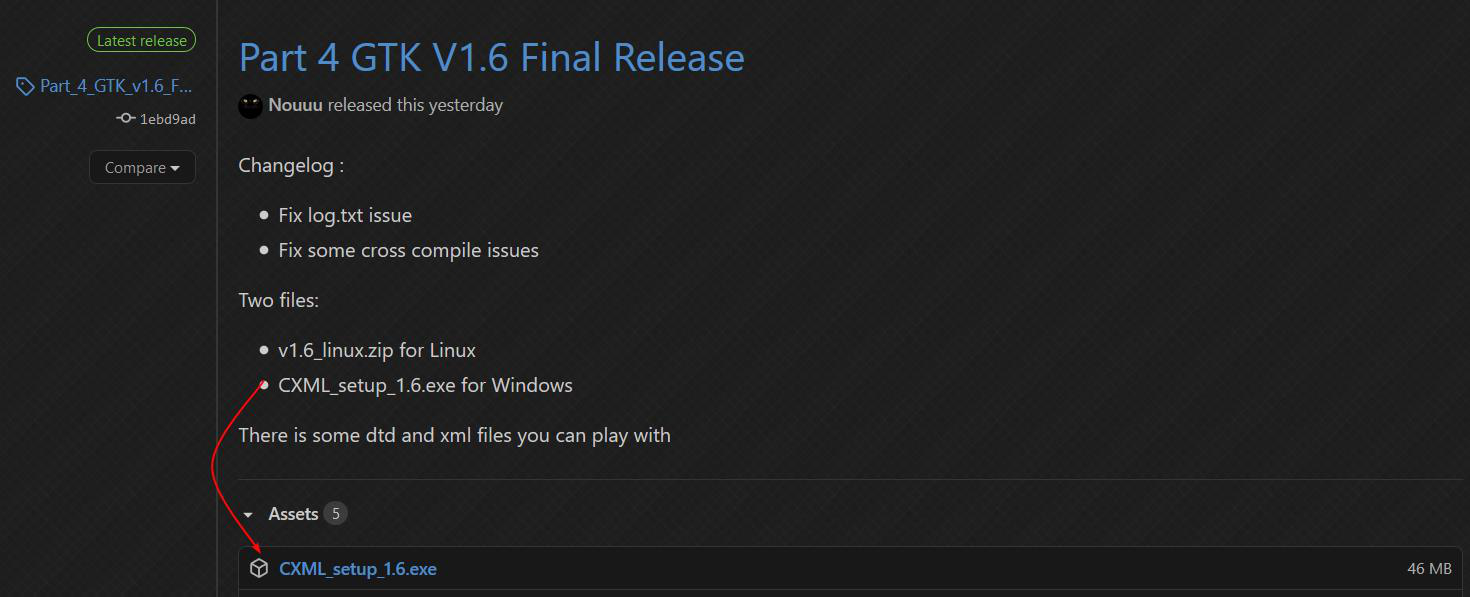
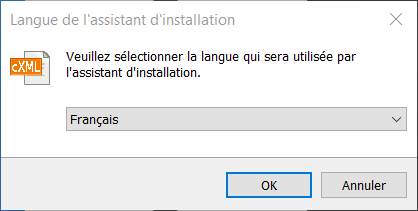
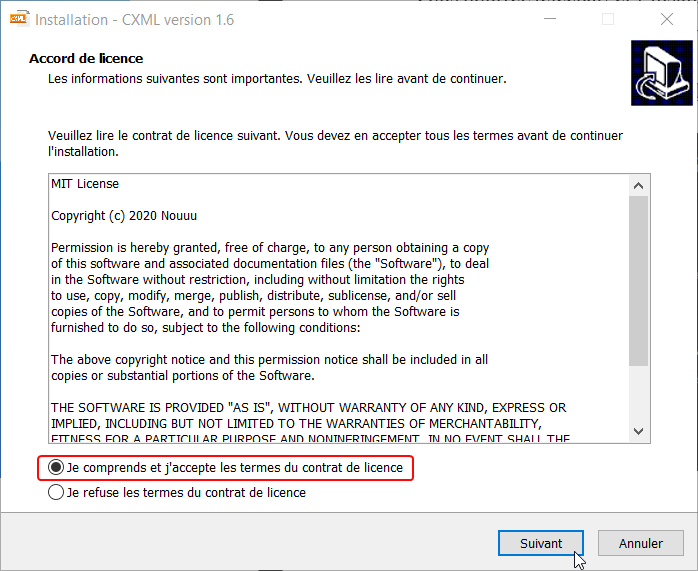
Lancez l'installateur et suivez toutes les étapes :
 |
 |
|---|---|
 |
 |
 |
 |
 |
 |
 |
 |
 |
DOSSIER D'UTILISATION
PARTIE 1 A 3 (MENU LIGNE DE COMMANDES)
L'application en ligne de commande peut s'exécuter de deux manières différentes.
Exécution avec arguments
La première façon d'exécuter le programme est de le lancer en ligne de commande en mettant en argument :
- Le chemin du fichier XML (relatif ou absolue)
- Le chemin du fichier DTD (relatif ou absolue)
Si les arguments fournis à l'entrée du programme ne sont pas valides (mauvaise extension ou fichier inexistant, pas accessible en lecture), le programme va basculer automatiquement sur le menu pour renseigner des chemins valides.

Exécution avec le menu
Il est également possible de lancer le programme en double-cliquant dessus, ou bien en ligne de commande, mais sans donner d'arguments.
Dans ce cas-là, le programme vous demandera de renseigner un chemin valide vers un fichier XML, puis un chemin valide vers un fichier DTD.
Le programme continuera de demander à l'utilisateur un chemin valide tant que celui-ci ne fournira pas un fichier :
- Avec la bonne extension (.xml ou .dtd)
- Qui existe bien sur le disque et accessible en lecture

Lancement de la validation
Une fois que les paramètres du programme sont validés, celui-ci va automatiquement lancer le processus de validation.
Si tout se passe bien, on devrait avoir ce résultat :

Dans le cas où le fichier XML n'est pas conforme à la DTD, un message d'erreur indiquant quelle règle n'est pas respecté apparait :

Si le fichier XML n'est pas valide (syntaxiquement parlant) la validation DTD n'a pas lieu de se lancer et un message indiquant la ligne, la colonne et le type d'erreur est affiché :

PARTIE 4 (APPLICATION INTERFACE GRAPHIQUE GTK)
Voilà comment se présente l'application graphique. C'est ici que nous allons importer nos différents fichiers et vérifier leur exactitude.
- Importer un fichier XML
- Importer un fichier DTD
- Vide la console
- La console
- Affiche le statut de l'application
- Bouton pour lancer la validation

Importation du fichier XML
 |
 |
|---|
Importation d'un fichier autre que XML (Gestion d'erreur)
 |
 |
|---|
Si j'ouvre un fichier avec une autre extension que .xml, une erreur s'affiche.
Importation du fichier DTD
 |
 |
|---|
Validation du document


Une fois tous les documents importés et validés par l'application, il ne vous reste plus qu'à presser le bouton "** Validate document**" afin de vérifier la conformité des documents.
On peut voir les traitements effectués par l'application dans la console. Une fois cela fini, il est clairement indiqué si oui ou non le fichier XML est conforme à la DTD.
Pour le champ « statuts » le code couleur est relativement simple, la couleur verte signifie que le traitement lancé s'est effectué avec succès et la couleur rouge signifie qu'il y a une erreur et donc que le fichier XML n'est pas conforme à la DTD.
BILAN DU PROJET
POINTS NON RESOLUS
Auto-complétions
Il est indiqué dans la partie 4 du projet que l'application doit proposer des suggestions des prochains éléments ou attributs lors de l'écriture de fichier XML, autrement dit une auto-complétions.
Cependant, faute de temps, c'est un point que nous n'avons malheureusement pas pu aborder.
Nous avons cependant réfléchi à une solution qui consiste à exploiter notre document DTD parsé, on pourrait alors déterminer sur quelle balise l'utilisateur est en train d'éditer et lui proposer des complétions d'attributs ou d' enfants en fonction des règles associés au même nom de balise.
PROBLEMES RENCONTRES
Temps imparti
Le délai a respecté nous a posé quelques soucis, comme dit précédemment faute de temps nous n'avons pas pu finir complètement le projet. Pour organiser des points avec tous les membres de l'équipe, nous avons dû composer avec les agendas de chacun.
Connaissances sur le sujet
Pour ce projet, nous connaissions très mal le XML et pas du tout la DTD. Il a donc fallu apprendre, comprendre toutes les subtilités et s'assurer que toutes les personnes du groupe ai compris.
Sur le langage C, nous n'étions pas tous au même niveau et comme le projet était assez conséquent, il a fallu faire de la mise à niveau au fur et à mesure que l'on attaquait des fonctionnalités avancées.
Méthodes de parsing
Aucun de nous n'a jamais vraiment fait de parsing ou même approcher la notion.
Il a donc fallu partir de 0, essayer, effacer, recommencer tout depuis le début de nombreuses fois avant de trouver un moyen viable de le faire...
Finalement il y a eu 5 versions intermédiaires très différentes pour parser un document avant d'avoir la méthode et les structures de données finales.